If your sink has turned into a splash zone, your water bill is creeping up, or your faucet just sputters where it used to flow, the cheapest and fastest fix is almost always a new aerator — and a bathroom faucet universal aerator kit is the smartest $8–$20 you can spend on a fixture you use a dozen times a day. Below we’ll cover exactly what “universal” means in plumbing terms, how to tell which adapter your faucet needs, what GPM rating to pick for your scenario, and when a universal unit is a no-go (yes, it happens).
What exactly is a “universal” aerator — and why isn’t every aerator universal?
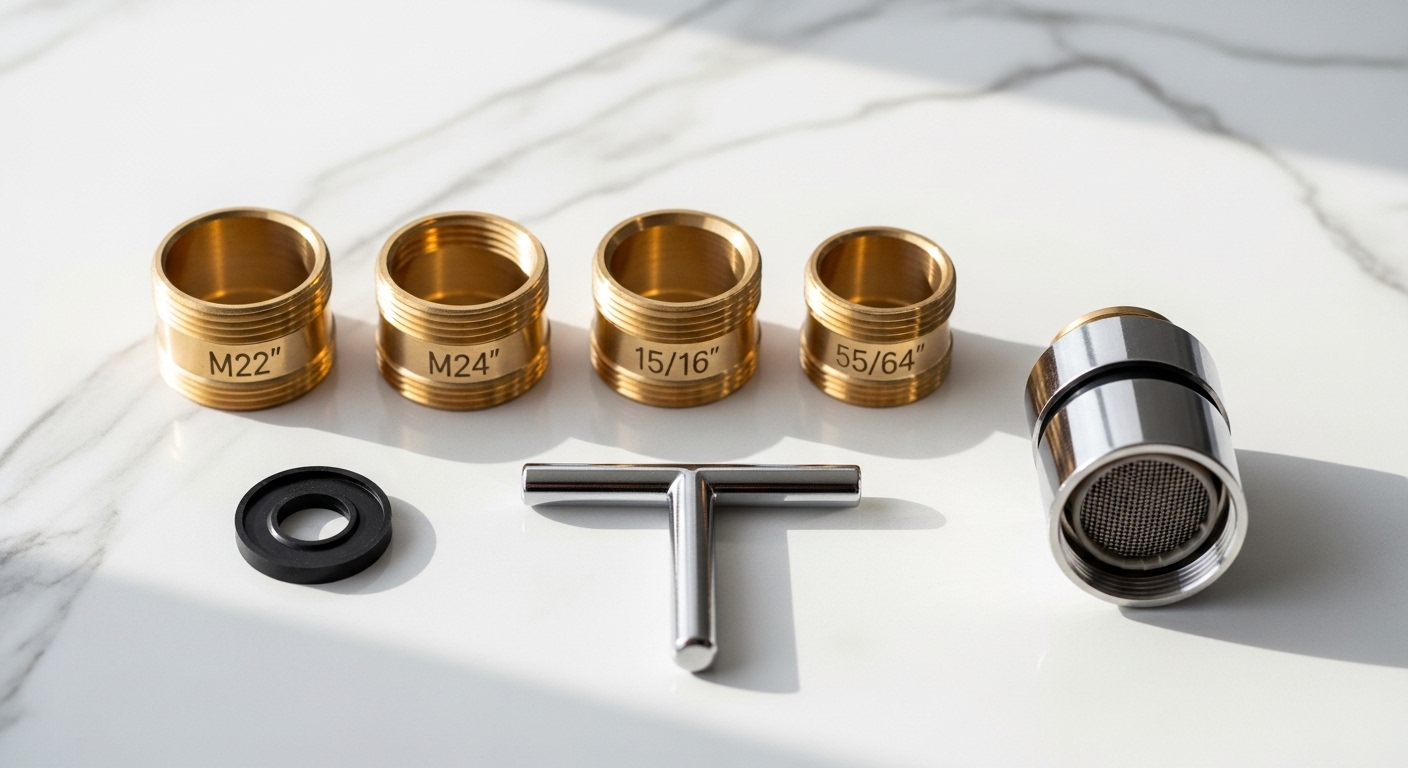
A universal aerator is a small mesh-and-housing device that screws onto the tip of your faucet spout, but with an adapter system that lets it mate with the four thread sizes used on roughly 95% of North American bathroom faucets. Regular OEM aerators only fit one specific brand and model; a universal kit ships with bushings and washers so the same insert can adapt to whatever you’ve got.
Inside the housing, three things are happening at once:
- The screen breaks the solid stream into thousands of small droplets, which feels softer and reduces splashing.
- Air is drawn in through side vents and mixed with the water — that’s the “aer-” in aerator — which is why aerated water feels fuller at a lower flow rate.
- The flow restrictor (a small rubber disc) meters the actual gallons per minute, typically 1.0, 1.2, 1.5, or 2.2 GPM.
So when an aerator brand says “universal,” they mean universal fit, not universal flow. You still pick the GPM that suits your sink. And “universal” is only true if your faucet’s spout has standard threads at all — which is where things get tricky.
How do I know which size aerator my bathroom faucet needs?
You measure the outside diameter of the threads (or inside, if female) with a caliper or a printed sizing card — most universal kits include a paper template. There are four sizes that cover nearly every standard bathroom faucet sold in the US:
| Aerator Thread Size | Type | Outside Diameter | Where You’ll Usually Find It |
|---|---|---|---|
| Regular Male (15/16″-27) | Male, threads outside | ~24 mm / 0.94″ | Most US kitchen faucets, some older bathroom faucets |
| Regular Female (55/64″-27) | Female, threads inside | ~22 mm / 0.87″ (inside) | Standard US bathroom faucets (Moen, Delta, Kohler since ~2005) |
| Junior Male (M24 x 1) | Male, metric | ~24 mm | European brands, Grohe, Hansgrohe, some Pfister bath |
| Junior Female (M22 x 1) | Female, metric | ~22 mm (inside) | Compact bathroom faucets, vanity faucets, some import brands |
The fastest test if you don’t have calipers: take a US quarter and a US nickel. A quarter (~24.3 mm) lined up against the spout end should be just slightly larger than the threads if you’ve got a Regular faucet. A nickel (~21.2 mm) will be a hair smaller than the Junior sizes. If neither is close, you almost certainly have a non-standard or “cache” aerator (more on that below).
Why does my faucet have no visible threads at all?
Because you probably have a cache aerator — also called a “hidden” or “tool-required” aerator. Brands like Delta, Moen, Kohler, and Pfister increasingly use them on premium lines to keep the spout looking clean and seamless. The aerator is recessed inside the spout and held by a faceted plastic ring you can only loosen with a proprietary key (often a small plastic tool that came taped to the spec sheet). Cache aerators are usually M16.5 x 1 or other oddball sizes, and a generic universal kit won’t fit them. You have to order the OEM replacement from the manufacturer — but the good news is they typically cost under $10.
How do I remove a stuck aerator without scratching my faucet finish?
Wrap the aerator in a strip of masking tape or a thick rubber band, grip it with channel-lock pliers, and turn it counterclockwise (looking up at the spout) — slow, steady, no jerks. The tape or rubber stops the jaws from biting into the chrome, brushed nickel, or matte black finish. If it still won’t budge after a quarter turn of real effort, stop and try one of these in order:
- Soak it in white vinegar for 1–2 hours. Wrap a vinegar-soaked paper towel around the aerator and seal it with a small zip-top bag and rubber band. Mineral buildup is almost always why aerators seize; vinegar dissolves the calcium carbonate.
- Apply heat. A hair dryer on high for 30 seconds expands the brass aerator faster than the chrome spout, breaking the seal.
- Use a strap wrench. A rubber strap wrench distributes force around the whole circumference instead of pinching one spot.
- Penetrating oil as a last resort. A drop of PB Blaster at the seam, let it sit overnight. Avoid WD-40 — it doesn’t penetrate as well and leaves residue.
If you’re chasing a sputtering or spraying issue rather than a stuck part, our walkthrough on how to fix a faucet that sprays water everywhere covers the related diagnostics — debris in the cartridge, a torn O-ring, or a partially blocked aerator screen.
What GPM should a bathroom faucet aerator be — 1.0, 1.2, 1.5, or 2.2?
For a bathroom (lavatory) faucet, 1.2 GPM is the sweet spot. It’s the current EPA WaterSense maximum for bathroom faucets, feels almost identical to higher flows because of aeration, and saves about 30% of water vs. the old 2.2 GPM standard. Here’s when to go higher or lower:
| Flow Rate | Best For | Feel | Compliance Notes |
|---|---|---|---|
| 1.0 GPM | Powder rooms, guest baths, drought-restricted areas (CA, CO) | Gentle, slightly weak for hand-washing | Meets CalGreen Tier 2 |
| 1.2 GPM | Primary bathroom sinks (recommended default) | Strong and aerated — feels like more | EPA WaterSense certified |
| 1.5 GPM | Households with low static water pressure (<40 psi) | Robust, no perceptible drop-off | Federal max for new bath faucets (US) |
| 2.2 GPM | Utility sinks, mop sinks, kitchen faucets only | Heavy, fills cups fast | Not legal on new bath faucets in most US states |
One nuance for older homes: if you live in a multi-story house with poor incoming pressure, a 1.0 GPM aerator can feel like a drizzle on the third floor. Test with 1.2 GPM first; you can always swap down later. Most universal kits include two or three flow restrictors you can stack or swap inside the same housing.
Will a universal aerator help with hard water and white crusty buildup?
It helps temporarily, but it isn’t a permanent fix — the real cure is addressing the water itself. A new aerator restores flow because you’re removing the calcium-clogged screen, but the new one will clog again on the same schedule (usually 6–18 months in hard water areas). The smarter long-term move is choosing a faucet body and finish that resists scale, which we cover in our guide on the best bathroom faucet material for hard water.
That said, a few aerator tricks specifically for hard water households:
- Choose a kit with a stainless steel mesh, not nylon. Stainless resists pitting and is easier to vinegar-clean.
- Look for “dual-thread” aerators with removable screens. You can pop the screen out monthly without removing the whole aerator.
- Avoid laminar (non-aerated) flow models in hard water. They look beautiful (clear glass rod of water) but clog faster because the orifices are tiny.
- Set a 90-day reminder to soak in vinegar. Twenty minutes in straight white vinegar adds years to the aerator’s life.
Are universal aerators worth it versus buying the exact OEM replacement?
For 95% of homeowners, yes — a quality universal kit ($10–$20) is better value than chasing the exact OEM part. You get adapters for every thread size in your house (kitchen + bath + utility), a spare insert, and you’re not locked into one brand’s parts catalog. But there are three scenarios where you should buy OEM:
- Cache/hidden aerators. If your faucet has the recessed style, no universal kit fits — order direct from Delta, Moen, Kohler, etc.
- Decorative/finish-matched aerators. Some high-end faucets (think champagne bronze, brushed gold) have aerators finished to match the spout. A standard chrome universal will look wrong.
- Touch/touchless faucets with integrated solenoids. The flow geometry is tuned to the valve — swapping in an off-the-shelf aerator can cause stutter or sensor false-triggers. If you’re researching this category, our widespread touchless faucet buying guide covers what to expect from sensor faucets.
How long should a bathroom aerator actually last?
In soft water (under 60 ppm hardness): 5–7 years. In moderate water (60–120 ppm): 2–4 years. In hard water (120+ ppm): 12–24 months. The failure mode is almost never the brass housing — it’s the rubber washer cracking or the screen clogging beyond what vinegar can dissolve. Brass universal aerators from reputable manufacturers carry 5-year warranties; plastic-bodied ones rarely last more than 18 months in any water condition. Spend the extra $4 for solid brass.
What should I look for in a quality bathroom faucet universal aerator?
Buy on materials and certifications, not on the picture. A trustworthy aerator kit should check all five of these boxes:
- Lead-free brass body (CA AB 1953 compliant or NSF/ANSI 372). Skip anything labeled only “metal” or “alloy.”
- NSF/ANSI 61 certification for drinking water safety — non-negotiable on a faucet that touches every glass of water you drink.
- EPA WaterSense label if you want a 1.2 GPM unit, which guarantees actual tested flow performance.
- Stainless steel mesh screen, not nylon or aluminum.
- Includes the full adapter set (all four common thread sizes), washers, and a removal key.
Avitas Home’s aerator kits are tested to ASME A112.18.1 / CSA B125.1 for plumbing fittings, NSF/ANSI 61 for potable water contact, and ship with a limited lifetime functional warranty on the brass housing. They’re sourced from the same OEM facilities that supply major US faucet brands, but priced direct.
Step-by-step: replacing your bathroom aerator in under 5 minutes
- Close the drain or cover it with a rag. Small parts will fall out.
- Remove the old aerator by hand if possible — turn counterclockwise looking up at the spout.
- If it’s stuck, wrap in tape and use pliers (see the section above).
- Inspect the spout threads for damage and clean off any old plumber’s tape or mineral residue with a toothbrush.
- Identify your thread size using the included sizing card or by matching adapters one at a time.
- Place the rubber washer inside the aerator housing — orientation matters; the flat side faces the faucet.
- Screw the new aerator on hand-tight, then add a quarter-turn with pliers (tape-wrapped) — no more, or you’ll crush the washer.
- Turn the water on slowly and check for drips at the threads. Wipe the spout dry; any moisture appearing is a leak.
- Run hot and cold separately for 30 seconds each to flush any sediment that came loose.
If you finished step 9 and the flow is uneven or sprays sideways, there’s debris caught in the screen — unscrew, rinse under high-pressure tap water, and reinstall. This is also a common symptom of a faulty cartridge rather than the aerator itself; for cartridge and handle diagnostics see our piece on why a Delta faucet handle gets loose and how to fix it fast.
FAQ
Will a universal aerator fit a Delta, Moen, or Kohler bathroom faucet?
Yes, in almost every case — Delta, Moen, and Kohler bathroom faucets sold in the US since about 2005 use the standard 55/64″-27 female thread, which is included in every universal kit. The exception is their premium lines with hidden “cache” aerators (often labeled as Moen MotionSense, Delta H2Okinetic, or Kohler Konnect models), which require an OEM key and an OEM aerator.
What’s the difference between an aerator and a flow restrictor?
An aerator mixes air into the water stream and softens the feel; a flow restrictor is a small rubber disc that physically limits how many gallons per minute pass through. Most modern aerators contain a flow restrictor inside the housing, but you can buy each separately. If you only care about saving water without changing the spray feel, swap just the restrictor. If you want a softer, splash-free stream, replace the whole aerator.
Why does my new universal aerator leak around the threads?
Almost always one of three causes: the rubber washer was installed upside-down, the washer is missing entirely, or you over-tightened and split it. Unscrew, check the washer orientation (flat side toward the faucet), and hand-tighten plus a quarter-turn — that’s it. If the threads themselves are damaged, a single wrap of PTFE plumber’s tape can seal minor imperfections, but more than two wraps will prevent the aerator from seating properly.
Can a universal aerator increase my water pressure?
It can’t increase pressure, but it can dramatically improve the feel of pressure by aerating the stream and tightening the spray pattern. If your real complaint is low pressure across the whole house, the aerator is downstream of the problem — check your pressure regulator, supply valves, and incoming PSI before blaming the faucet. If only one faucet feels weak, removing and cleaning the aerator solves it about 80% of the time.
Are 1.0 GPM aerators too low for handwashing?
For most adults in a primary bathroom, 1.0 GPM feels noticeably weaker than 1.2 GPM, especially when rinsing soap off hands. For powder rooms, guest baths, and kid bathrooms it’s totally fine and meets California’s stricter CalGreen standard. If you’re undecided, start at 1.2 GPM — it’s the EPA WaterSense default and feels nearly identical to the old 2.2 GPM rate thanks to aeration.
How do I clean a universal aerator without removing it?
Fill a small plastic bag halfway with white vinegar, slip it up over the spout so the aerator is submerged, and secure with a rubber band. Leave it 1–2 hours, then run the faucet for 30 seconds to flush. This dissolves calcium without disassembly and works well as a quarterly maintenance routine, especially in hard water households.
Is brass or plastic better for an aerator housing?
Brass — every time. Plastic housings warp under hot water cycling, crack when tightened, and don’t hold threads after repeated removal. A solid brass housing costs $3–$5 more but lasts 5–10 years. Look specifically for “lead-free brass” or “NSF 372 compliant” to make sure you’re not getting old-spec brass with leachable lead content.
The bottom line
A bathroom faucet universal aerator is one of the highest-ROI plumbing upgrades you’ll ever make — under $20, five minutes of work, immediate water savings of 20–30%, and a noticeably nicer stream. The “universal” claim is real for the four standard US thread sizes, which cover 95% of bathroom faucets. Match your thread, pick 1.2 GPM unless you have specific reasons otherwise, buy lead-free brass with NSF 61 certification, and you’re done. For the remaining 5% with hidden cache aerators, accept the small premium of an OEM part and move on.
If you’re shopping for a full new fixture rather than just an aerator, our latest bathroom faucets buying guide walks through cartridge type, finish durability, and installation patterns in detail.
About the author: This guide was written by the Avitas Home product team — a group of licensed plumbers, design engineers, and customer-experience leads with a combined 30+ years in residential plumbing fixtures. Every product we recommend has been bench-tested in our QA lab for flow rate accuracy (within ±5% of stated GPM), thread tolerance (per ASME A112.18.1), and 10,000-cycle endurance. Avitas Home is a US-based bathroom and kitchen fixtures brand offering a limited lifetime warranty on solid-brass aerator housings and a 60-day return window on every kit we sell.