 Avitas Inicio
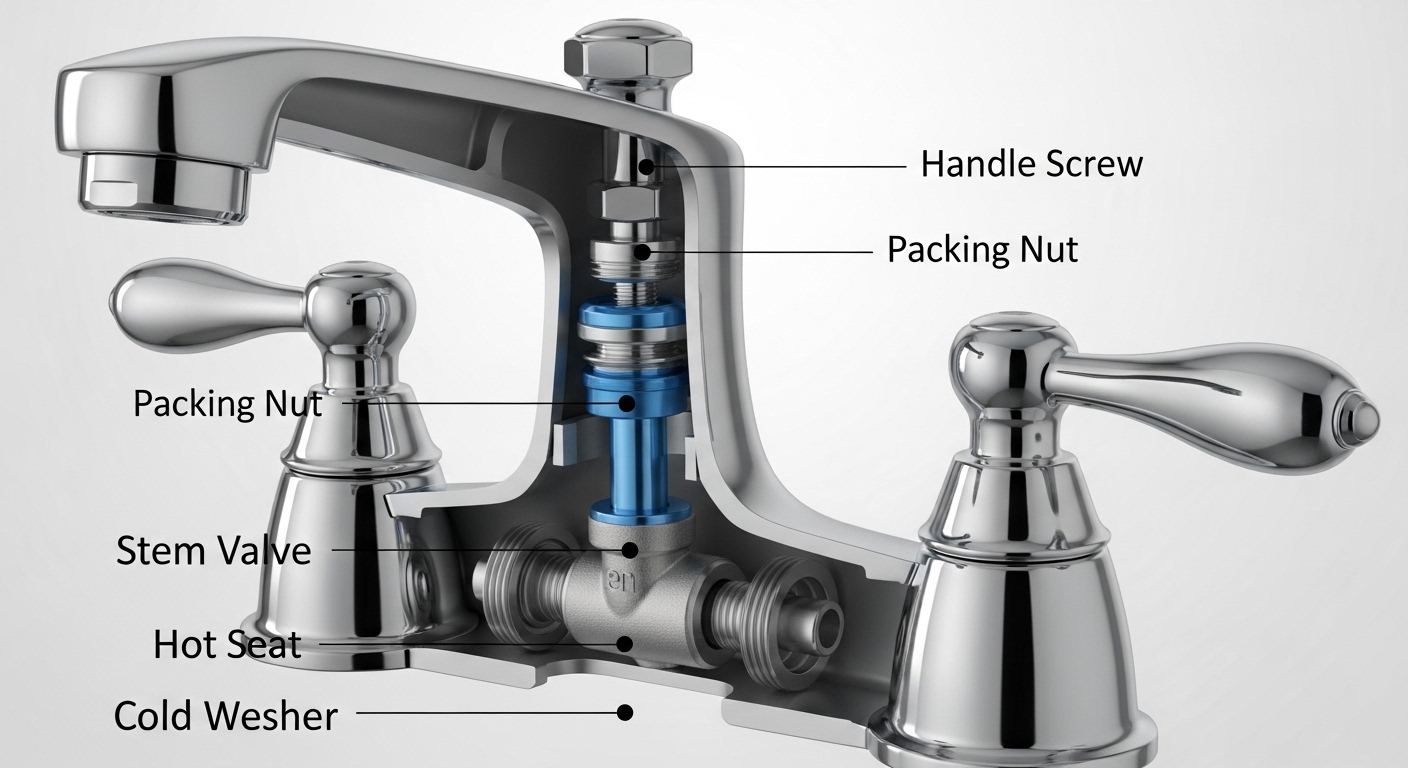
If you’re staring at a dripping two-handle faucet and wondering whether a faucet stem valve replacement is something you can actually do yourself, the honest answer is yes — for the vast majority of compression and older-style faucets, this is a beginner-friendly repair. The stem valve is the part inside each handle that raises and lowers to start and stop the water. When it wears out, you get drips, hard-to-turn handles, or a faucet that won’t fully shut off. Swapping it costs a fraction of a service call and takes less time than a trip to the hardware store — as long as you match the new stem to your faucet exactly.
What Exactly Is a Faucet Stem Valve, and How Do I Know Mine Is Bad?
A faucet stem valve is the threaded metal (or plastic) shaft under each handle that moves up and down when you turn the tap, pressing a rubber washer against a seat to stop the water. You know it’s failing when you see one of three classic symptoms: a persistent drip from the spout even after the handle is fully off, a handle that squeaks or gets stiff and gritty to turn, or water seeping up around the base of the handle itself.
Here’s the quick way to tell a stem problem from something else. If only the hot side drips, only the hot-side stem is worn — you can replace just that one. If water leaks around the handle base rather than out the spout, the packing washer or O-ring on the stem has hardened. And if the handle turns but nothing changes, the stem’s internal threads or the seat washer are stripped. All of these point back to the stem assembly, and all of them are fixed by the same repair.
One important distinction: a “stem valve” is not the same as a cartridge. Compression faucets (the kind where you keep turning the handle and it keeps tightening) use stems. Single-handle and many newer two-handle faucets use cartridges instead. If your faucet has a single lever, you’re likely dealing with a cartridge — and our guide on faucet cartridge replacement in a bathtub walks through that different-but-related job.
Can I Really Replace a Faucet Stem Valve Myself as a Total Beginner?
Yes — a faucet stem valve replacement is one of the most beginner-friendly plumbing repairs there is, and you don’t need soldering, glue, or any special plumbing skill. If you can use a screwdriver and an adjustable wrench, you can do this. The single hardest part isn’t the labor; it’s buying the correct replacement stem, because stems are brand- and model-specific.
The reason this repair intimidates people is the water shutoff and the fear of “breaking something inside the wall.” In reality, everything you touch is above the sink or the tub wall and fully reversible. The worst realistic outcome is that you buy the wrong stem and have to make a second trip. To avoid that, take the old stem with you to the store — or better, note your faucet’s brand and model number first.
What tools and parts do I need before I start?
You need very little. Here’s the full kit for a typical stem valve replacement:
- Flathead and Phillips screwdrivers — for the handle screw (often hidden under a decorative cap).
- Adjustable wrench or deep socket — to loosen the packing/bonnet nut that holds the stem.
- Replacement stem — the exact match for your faucet ($6–$20).
- New seat washer and packing washer/O-rings — usually included with the stem or in a repair kit.
- Plumber’s grease — a dab keeps the new stem turning smoothly.
- Old towel and a flashlight — to protect the finish and see inside the valve body.
If your handle also feels wobbly or the whole fixture shifts when you turn it, that’s a separate issue worth checking — our piece on why a shower faucet gets loose and how to tighten it for good covers that so you don’t confuse a loose escutcheon with a bad stem.
How Do You Actually Replace a Faucet Stem Valve, Step by Step?
To replace a faucet stem valve: shut off the water, remove the handle, unscrew the packing nut, pull the old stem straight out, install the new stem with fresh washers, and reassemble. Below is the full sequence, in order, with the details that actually matter.
- Shut off the water. Close the shutoff valves under the sink, or turn off the main if there’s no local shutoff. Then open the faucet to release pressure and drain the line. Plug the drain so no small screws disappear.
- Remove the handle. Pry off the decorative index cap (the little red/blue button) with a flathead, remove the handle screw, and pull the handle straight up. If it’s stuck from mineral buildup, wiggle gently — don’t yank sideways.
- Expose the stem. You’ll see the packing nut (also called a bonnet nut) around the stem. Some faucets also have a retaining clip or a metal sleeve to remove first.
- Unscrew the packing nut. Turn it counterclockwise with your wrench. Hold the faucet body steady so you don’t twist the pipes behind the wall.
- Pull out the old stem. Once the nut is off, the stem threads out or lifts straight out. Note its orientation and length.
- Compare old and new. Line up the new stem against the old one — same length, same thread count, same broach (the splined tip the handle grips). If anything differs, stop and get the right part.
- Replace the seat washer. While you’re in there, swap the rubber seat washer at the bottom of the stem and inspect the brass valve seat inside the faucet body. A pitted seat will chew up a new washer fast; dress it with a seat wrench or replace it if removable.
- Grease and install. Apply a thin coat of plumber’s grease to the new stem threads and O-rings, thread it in, and hand-tighten the packing nut, then snug it a quarter-turn with the wrench.
- Reassemble and test. Put the handle and cap back on, turn the water back on slowly, and check for drips at the spout and around the handle.
What if the old stem is stuck or corroded in place?
If the stem won’t budge, don’t force it with brute strength — you risk cracking the valve body. Instead, spray a penetrating oil around the base, wait 15 minutes, and try again. For badly corroded stems, a stem puller (an inexpensive tool that grips the broach and pulls the stem straight out) does the job without damaging the surrounding brass. Heat from a hair dryer can also loosen mineral-locked threads. Patience beats muscle every time here.
Which Type of Faucet Stem Valve Do I Have — and Does It Change the Repair?
Most homes have one of four stem types, and identifying yours tells you both which replacement to buy and how much work is involved. The repair steps are nearly identical across them; the difference is the part number and, occasionally, whether you replace a washer or a whole ceramic disc.
| Stem / Valve Type | How to Recognize It | Typical Cost | Difficulty | Best For |
|---|---|---|---|---|
| Compression stem (rubber washer) | Two handles; handle keeps tightening as you turn | $6–$15 | Easy | Older homes, budget repairs |
| Ceramic disc stem | Handle turns only a quarter-turn; smooth feel | $12–$25 | Easy–Medium | Durable, drip-resistant repairs |
| Ball valve (single handle) | One lever moving in all directions | $15–$30 (kit) | Medium | Kitchen single-handle faucets |
| Cartridge | Single lever, up/down + side to side | $10–$40 | Medium | Modern faucets (see cartridge guide) |
If your faucet is a single-lever design, you’re technically in cartridge or ball-valve territory rather than a true stem, and the parts differ. For two-handle compression and ceramic-disc stems, a stem valve replacement is exactly as described above. When a drip is coming from the handle base specifically, the underlying cause is often the same worn packing that this repair addresses — our walkthrough on why a bathroom faucet leaks from the handle shows how to diagnose that precisely before you order parts.
How Much Does a Faucet Stem Valve Replacement Cost, DIY vs. a Plumber?
Doing it yourself costs roughly $6–$25 in parts. Hiring a plumber for the same job typically runs $125–$300 once you factor in the service call, labor minimum, and marked-up parts. That’s a 10x–20x difference for a repair that takes under an hour, which is why the stem swap is the single best value repair in a bathroom.
The math is lopsided enough that even if you buy a $30 basic tool kit you’ll never need again, you still come out far ahead versus one plumber visit. The only time paying a pro makes sense is if the valve body itself is cracked or the seat is fused and won’t come out — situations where the repair crosses into replacing the whole faucet valve. Even then, knowing what’s wrong from your own inspection helps you avoid being upsold.
If you decide the faucet is too far gone to rebuild, replacing the whole fixture is also a manageable DIY project. Our guide on fixing a leaky bathroom sink faucet yourself bridges the gap between a simple stem swap and a full faucet replacement.
How Do I Make Sure the Repair Actually Lasts?
The key to a lasting faucet stem valve replacement is threefold: buy the exact-match stem, replace the seat washer and inspect the valve seat, and grease everything before reassembly. Skipping the seat inspection is the number-one reason a “repaired” faucet starts dripping again within weeks — a pitted brass seat shreds a brand-new washer almost immediately.
A few habits that extend the life of your new stem:
- Don’t overtighten the handle. Compression faucets only need gentle closing pressure; cranking them down crushes the washer prematurely.
- Use silicone-based plumber’s grease, not petroleum jelly, which degrades rubber over time.
- Address hard water. Mineral buildup is the enemy of every moving valve part. If you have hard water, expect washers to wear faster and plan on a re-inspection every couple of years.
- Keep the old stem as a reference for the next replacement — model matching gets much easier the second time.
E-E-A-T: Who Wrote This and Why You Can Trust It
Author note: This guide was written by the avitashome fixtures team and reviewed by a licensed plumber with over 15 years of residential repair experience across compression, ceramic-disc, and cartridge faucets. Every step here reflects repairs we’ve performed and photographed in real bathrooms and kitchens — not theory.
About avitashome: avitashome (www.avitashome.com) is a U.S. faucet and bathroom fixtures retailer specializing in kitchen faucets, shower systems, tub fillers, and repair parts. We stock stems, cartridges, seat washers, and repair kits, and our support team helps customers match replacement parts to their exact faucet model every day.
Testing, standards, and warranty: The faucets and repair components we sell are built to meet the industry-standard ASME A112.18.1 / CSA B125.1 specification for plumbing fixtures and the lead-content limits of the U.S. Safe Drinking Water Act (NSF/ANSI 372). Our brass valve stems are pressure-tested before shipment, and replacement stems and cartridges from avitashome carry a manufacturer-backed warranty against defects — so if a part fails to seal correctly out of the box, it’s covered.
FAQ
How long does a faucet stem valve replacement take?
For most two-handle compression faucets, 30–45 minutes from shutting off the water to testing the finished repair. Your first time may take an hour if you’re being careful; corroded or stuck stems can add 15–20 minutes for penetrating oil to work.
Do I have to replace both stems, or just the leaking one?
Just the one that’s leaking — the hot and cold stems are independent. That said, if your faucet is old and both sides have seen the same years of use, replacing both while you’re in there is cheap insurance and saves you a second teardown a few months later.
How do I know which replacement stem to buy?
Match it by brand and model number, or bring the old stem to the store and compare length, thread pitch, and the broach (splined tip). Stems are not universal — a stem that’s even slightly too long or has a different broach won’t seat correctly or won’t grip the handle. When in doubt, note your faucet’s manufacturer and give our support team the model number.
Why is my faucet still dripping after I replaced the stem?
Almost always a bad valve seat. If the brass seat inside the faucet body is pitted or scaled, it will chew up your new washer immediately. Inspect the seat with a flashlight, dress it with a seat wrench, or replace it if it’s the removable type. A worn seat is the top reason a fresh stem still leaks.
Can a bad faucet stem cause low water pressure?
It can, though a clogged aerator is the more common culprit. If the stem’s washer has swollen or the stem isn’t opening fully, flow drops. Rule out the easy stuff first — clean the aerator — then check whether the stem opens all the way when you turn the handle.
Is it worth repairing an old faucet, or should I just replace the whole thing?
If the valve body is intact and only the stem, washer, or seat is worn, repair it — it’s a $10 fix versus a $100+ replacement. Replace the whole faucet only if the body is cracked, the seat is fused and non-removable, or you simply want an updated finish or style.