Learning how to install kitchen faucet and garbage disposal units together is one of the smartest weekend upgrades you can tackle. Doing both at once means a single round of shutting off water, clearing out the cabinet, and crawling under the sink — and the new disposal often makes the faucet’s supply-line routing far cleaner. At Avitas Home, we’ve fielded thousands of installation questions from DIY homeowners, and the same handful of mistakes trip people up every time: skipping the dishwasher knockout, over-tightening braided supply lines, or forgetting the plumber’s putty seal. This guide pulls all of that into one straightforward walkthrough.
Whether you’re swapping a tired pull-out for a sleek pull-down sprayer, or finally upgrading from a noisy half-horsepower grinder to a quiet continuous-feed model, the steps below apply to nearly every standard 3-bolt mount disposal and 1- or 3-hole faucet deck configuration found in American homes. We’ll also flag the moments where calling a licensed plumber or electrician genuinely makes sense.
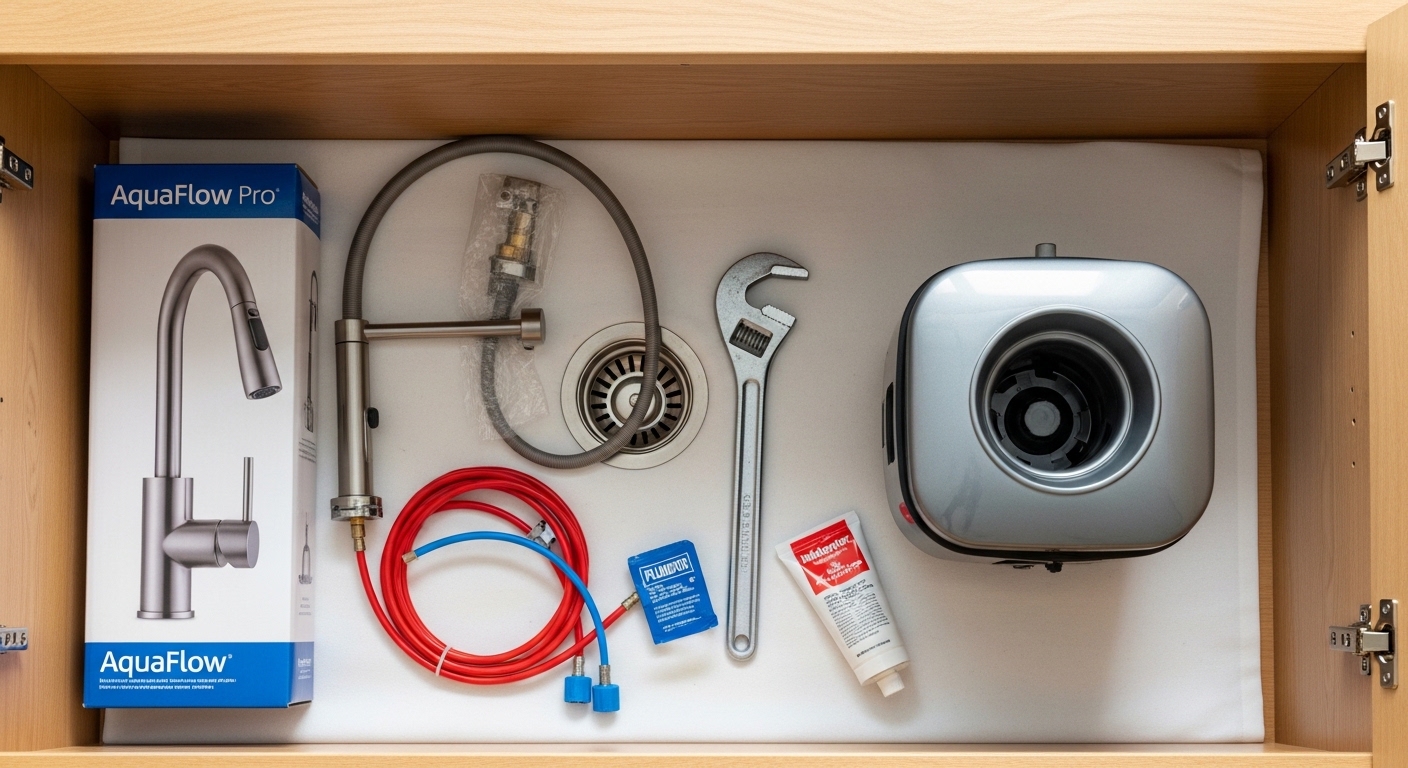
How to Install Kitchen Faucet and Garbage Disposal: Tools, Materials, and Prep
Before you touch a single wrench, gather everything in one place. The most common reason a 90-minute project balloons into a six-hour ordeal is a mid-job hardware store run. Here’s exactly what you’ll need to install a kitchen faucet and garbage disposal in one session.
Tools you’ll need
- Basin wrench — non-negotiable for the rear-mount faucet nuts you can’t reach with a regular wrench
- Adjustable wrench and channel-lock pliers
- Phillips and flathead screwdrivers
- Hex key set (usually 1/4″ for disposal mounting ring)
- Wire strippers and a voltage tester
- Bucket, towels, and a headlamp (the cabinet gets dark fast)
- Putty knife to scrape the old sink flange clean
- Plumber’s putty or 100% silicone sealant (check your disposal’s manual — some manufacturers void warranty if putty is used)
- Teflon tape (PTFE) for threaded connections
Materials checklist
- New kitchen faucet with deck plate (if going from 3-hole to 1-hole)
- New garbage disposal (1/2 HP minimum for households of 2–3; 3/4 HP or 1 HP for larger families and tougher waste)
- Two new braided stainless steel supply lines (3/8″ compression × 1/2″ or 3/8″ faucet connector — measure first)
- New angle stops (shut-off valves) if yours are 15+ years old or stiff
- Power cord kit with strain relief (most disposals ship without a cord)
- Dishwasher discharge hose clamp
- P-trap kit (1-1/2″ PVC, slip joints)
Pro tip from our install team: take a photo of your existing plumbing layout from three angles before you disconnect anything. You’ll thank yourself when you’re trying to remember which way the dishwasher hose looped.
Step 1: Shut Off Water, Power, and Drain the Lines
Reach under the sink and close both angle stops — clockwise to shut. Turn on the faucet to confirm the water is truly off and to relieve line pressure. If the angle stops won’t fully close (a common headache in homes built before 2000), shut off the main supply to the house instead. Now go to your electrical panel and flip the breaker that feeds the disposal outlet. Use a non-contact voltage tester at the outlet to verify zero voltage before you touch a wire — this single step is the difference between a smooth install and an emergency room visit.
Place a bucket under the P-trap. Loosen the slip nuts by hand or with channel-locks, and pull the trap away. Expect a cup or two of standing water. While you’re down there, inspect the tailpiece and trap for cracks; if they’re brittle, replace them rather than reusing.
Step 2: Remove the Old Kitchen Faucet
Disconnect the supply lines from the faucet shanks using your basin wrench. If you have a pull-down or pull-out sprayer, also disconnect the quick-connect coupling on the hose. Reach up behind the faucet body and loosen the mounting nuts (or horseshoe bracket on newer Moen, Delta, and Kohler models). Lift the old faucet out from above.
Scrape away any old putty or silicone from the deck with a plastic putty knife so it doesn’t gouge stainless or granite. Wipe the area with denatured alcohol for a clean bonding surface. If you’re dealing with persistent drips or a sprayer that misbehaves, our guide on how to fix a faucet that sprays water everywhere is worth bookmarking for the next time symptoms appear in your new fixture.
Step 3: Remove the Old Garbage Disposal
Disposals hang from a three-piece mounting assembly under the sink flange. Support the unit with one hand (they weigh 8–15 lb), then use a screwdriver or hex key in the lower mounting ring lugs and rotate counterclockwise. The disposal will drop free. Set it on the cabinet floor — don’t let it dangle by the discharge tube.
Unscrew the dishwasher discharge hose from the disposal’s inlet nipple. Open the electrical cover plate on the bottom of the unit (or the side, depending on brand), disconnect the hot, neutral, and ground wires, and unscrew the strain relief. Now lift the old unit out.
From above the sink, loosen the snap ring on the sink flange and push the flange up through the drain. Scrape off the old putty bead. The drain hole is now bare and ready for the new sink flange assembly.
Step 4: Install the New Kitchen Faucet First (Trust Us)
Here’s the order that saves your back: install the faucet before the disposal. With no disposal hanging in the cabinet, you have far more room to swing a basin wrench and reach the mounting hardware.
- If the new faucet has a single-hole deck and your sink is 3-hole, place the deck plate (escutcheon) over the holes with its included gasket.
- Feed the supply lines and any sprayer hose down through the center hole.
- From below, slide the rubber gasket, then the mounting plate or horseshoe bracket, up the shank.
- Hand-tighten the mounting nut, then snug it with your basin wrench. Do not use a pipe wrench — you’ll crush plastic threads.
- Connect new braided stainless supply lines to the angle stops. Hand-tight plus one-quarter turn with a wrench is enough. Over-tightening crushes the rubber washer and causes a slow drip you’ll chase for hours.
- If your faucet has a pull-down sprayer, attach the counterweight to the hose at the height specified in the manual (usually mid-hose) so the head retracts smoothly.
For inspiration on matching finishes and styles, see our latest bathroom faucets buying guide — many of the finish principles (matching brushed nickel kitchen and bath, or going bold with matte black) apply equally to kitchen selections.
Step 5: Install the New Garbage Disposal Sink Flange
Roll a 1/2″-thick rope of plumber’s putty (or a 1/4″ bead of silicone, per your manufacturer’s spec) around the underside of the new sink flange. Press it firmly into the drain opening from above and weight it down with the disposal itself or a couple of books to keep pressure on the seal while you work below.
From under the sink, slip the fiber gasket, backup ring, and mounting ring onto the flange in the order shown in your manual. Compress them upward and slide the snap ring into the groove on the flange. Now tighten the three mounting screws evenly — a quarter turn at a time, going around in sequence — until the assembly is firm against the sink. Wipe away the putty squeeze-out from the top side.
Step 6: Wire and Hang the Garbage Disposal
Open the bottom cover plate. Feed the power cord through the strain relief and into the electrical chamber. Connect black to black (hot), white to white (neutral), and the bare copper or green wire to the green ground screw. Tighten the strain relief screws so the cord can’t be pulled out. Replace the cover plate.
Critical step that 60% of DIYers skip: If you’re connecting a dishwasher, knock out the dishwasher inlet plug inside the disposal’s side inlet. Use a screwdriver and hammer to pop it out, then reach inside the grinding chamber with needle-nose pliers and remove the loose plug. Forgetting this turns your first dishwasher run into a flood under the sink.
Lift the disposal up to the mounting ring, align the three tabs, and rotate the lower ring clockwise until it locks. Use the wrenchette (included) or a screwdriver in the lug to give it a final firm turn.
Step 7: Connect Drains, Dishwasher Hose, and the P-Trap
Attach the discharge tube to the side of the disposal with the included gasket and flange bolts. Connect the dishwasher hose to the side inlet and secure with a hose clamp — point the clamp’s screw toward the front of the cabinet for future access. Route the dishwasher hose in a high loop up to the underside of the countertop (or to an air gap, if your local code requires one) to prevent backflow.
Assemble the P-trap so the discharge tube enters the trap, and the trap arm slides into the sanitary tee in the wall. Hand-tighten all slip nuts; over-tightening cracks plastic threads. The trap should sit level and the trap arm should slope down toward the wall at roughly 1/4″ per foot.
Comparing Garbage Disposal Horsepower: Which One Fits Your Kitchen?
Horsepower is the single biggest spec that determines disposal longevity, noise level, and what you can actually grind. Here’s how the common tiers stack up.
| Horsepower | Best For | Typical Noise | Handles Fibrous Waste? | Average Lifespan |
|---|---|---|---|---|
| 1/3 HP | Apartments, 1 person | Loud (75+ dB) | Poor | 5–7 years |
| 1/2 HP | Households of 2–3 | Moderate (70 dB) | Light fibrous only | 8–10 years |
| 3/4 HP | Families of 4–5, frequent cooks | Quiet (60–65 dB) | 좋다 | 10–12 years |
| 1 HP+ | Large families, heavy meal prep | Very quiet (55 dB) | Excellent | 12–15 years |
Step 8: Turn Water On and Leak-Test Everything
Remove the faucet aerator (this catches sediment that gets dislodged from the supply lines). Slowly open both angle stops. Let cold water run for 30 seconds, then hot. Watch every connection — the angle stops, the supply line nuts at the faucet shank, the P-trap slip joints, and the disposal discharge flange. A single drop forming every 10 seconds is still a leak; fix it now.
Plug the sink and fill it halfway, then pull the stopper to send a full slug of water through the disposal and trap. This pressure-tests the slip joints far better than a trickle. If everything stays dry, reinstall the aerator and run the disposal — with cold water flowing — for a few seconds to confirm smooth operation. A new disposal should sound like a low hum, not a rattle. If you hear metal-on-metal, shut it off and check for shipping debris in the chamber.
Already noticing drips? Our step-by-step on how to fix a leaky kitchen faucet covers the exact culprits — usually a cartridge O-ring or an under-torqued supply nut.
Common Mistakes to Avoid When Installing a Kitchen Faucet and Garbage Disposal
- Reusing old supply lines. Braided stainless lines are cheap insurance — $8 each — and the rubber inside the old ones is the #1 source of slow under-sink leaks after a remodel.
- Skipping the dishwasher knockout. We mentioned it above, but it bears repeating: this single oversight causes more service calls than any other DIY mistake.
- Mixing dissimilar metals. A brass faucet shank into a galvanized supply nut without a dielectric fitting will corrode within a few years.
- Hard-wiring when the outlet is on a switched circuit. Most modern disposals are designed for cord-and-plug connection to a switched outlet under the sink. Hard-wiring may violate local code.
- Forgetting the air gap. California, Minnesota, and several other states require a dishwasher air gap by code, not just a high loop. Check before you finish.
Brand Comparison: Popular Faucet & Disposal Pairings
| Faucet Brand | Best Pairing Disposal | Average Warranty | Typical Price (Faucet + Disposal) |
|---|---|---|---|
| Moen | InSinkErator Evolution Compact | Limited Lifetime / 7-year | $280 – $520 |
| Delta | Waste King L-8000 | Lifetime / 8-year | $260 – $480 |
| Kohler | Kohler PRO 1.0 HP | Lifetime / 7-year | $340 – $640 |
| 아비타스 홈 | InSinkErator Badger 5XP | Lifetime / 6-year | $220 – $410 |
For a deeper look at one of the most popular American kitchen faucet lines, our Moen Doherty kitchen faucet reviews covers durability, finish wear, and real owner feedback after 12 months of use.
When to Call a Pro Instead
DIY is genuinely the right answer 80% of the time, but skip the hero move if any of the following apply:
- Your shut-off valves won’t close (you’ll need the main shut off for hours)
- You don’t have a dedicated 15-amp circuit for the disposal
- The drain plumbing is galvanized steel (high risk of cracking when disturbed)
- You’re moving the faucet to a new hole location in a stone countertop
A licensed plumber typically charges $200–$450 for a faucet+disposal swap in 2026, with same-day completion and a labor warranty.
Care, Maintenance, and Testing Standards
Every faucet sold at Avitas Home meets NSF/ANSI 61 and NSF/ANSI 372 lead-free certifications, and our pull-down sprayers are cycle-tested to 500,000 actuations — roughly 30 years of daily use. Garbage disposals from major US manufacturers (InSinkErator, Waste King, Moen) are UL listed and carry warranties from 2 to 10 years. Register your unit within 30 days of installation to activate the full warranty period; most manufacturers reduce coverage for unregistered products.
To extend the life of both fixtures: run cold water for 15 seconds before and after each disposal use, avoid pouring grease down the drain, and clean the faucet aerator every 3–6 months by unscrewing it and soaking it in white vinegar to dissolve mineral buildup.
FAQ
How long does it take to install a kitchen faucet and garbage disposal together?
For a confident DIYer with the right tools, plan on 2 to 3 hours for both. First-timers should budget 4 to 5 hours and watch one full video walkthrough before starting. Doing them together saves about 45 minutes versus two separate jobs.
Do I need a permit to replace a kitchen faucet or garbage disposal?
In most US jurisdictions, a like-for-like replacement of either fixture does not require a permit. New installations (where no disposal previously existed) sometimes require an electrical permit because of the dedicated circuit. Check your city’s building department website — most have a one-page guide.
What size garbage disposal do I need for a family of four?
A 3/4 HP continuous-feed disposal is the sweet spot for most American four-person households. It handles fibrous vegetables, small bones, and citrus rinds without jamming, and the larger motors run quieter under load than 1/2 HP units pushed to their limit.
Can I install a garbage disposal under a single-bowl sink?
Absolutely — and it’s actually easier than a double-bowl install because you only need one P-trap and one tailpiece. Just confirm there’s at least 14″ of vertical clearance from the bottom of the sink to the cabinet floor for the disposal to hang freely.
Should I use plumber’s putty or silicone for the sink flange?
Read your disposal’s installation manual first. Several brands — including some InSinkErator and Moen models — explicitly require silicone and void the warranty if plumber’s putty is used (the oils can degrade certain plastics). When in doubt, 100% clear silicone is the universally safe choice.
Why does my new disposal hum but not spin?
A humming disposal usually means the flywheel is jammed. Insert the wrenchette (the hex key that ships with the unit) into the bottom center socket and turn back and forth to free it. Then press the red reset button on the bottom. If the hum continues, shut off power and check for a foreign object in the chamber with a flashlight — never your hand.
Can one supply line feed both the faucet and a dishwasher?
No. The dishwasher needs its own dedicated hot-water supply line from a separate angle stop. Trying to T off the faucet’s supply line will cause pressure drops and is not code-compliant in any US jurisdiction.
About the Author & 아비타스 홈
This guide was written and reviewed by the Avitas Home content team in collaboration with our in-house installation specialists, who collectively have over 25 years of residential plumbing experience across single-family homes, multi-family units, and light commercial projects. Avitas Home is a US-based retailer of premium faucets, shower systems, and bathroom fixtures, with every product backed by our lifetime finish warranty and a 30-day no-questions return policy. For product recommendations specific to your sink configuration, our customer support team responds within one business day.