If you’re staring at a dripping shower that no replacement cartridge will fix, you’re probably facing a full shower rough in valve replacement — swapping out the brass valve body buried inside your wall, not just the trim or handle you can see. This is the part that mixes hot and cold water and feeds the showerhead and tub spout. It’s a real plumbing job, but thousands of homeowners tackle it every year, and once you understand what’s actually behind that wall, it stops feeling so intimidating.
At avitashome, we spend our days deep in faucet and shower hardware — valves, cartridges, trim kits, finishes — so this guide focuses strictly on the shower valve itself: when to replace the whole rough-in, how the job actually goes, what it costs, and where DIYers get burned. Let’s get into it.
What exactly is a shower rough in valve, and why would it need replacing?
The rough-in valve is the brass body sealed inside your wall that all the plumbing connects to — it’s the heart of the shower. You replace the whole valve (not just the cartridge) when the body itself is cracked, corroded, leaking inside the wall, or so outdated that no modern cartridge or trim kit fits it anymore.
Here’s the key distinction most people miss. Your shower has two parts:
- The trim — the handle, escutcheon (the round plate), showerhead, and tub spout. This is everything you see and touch.
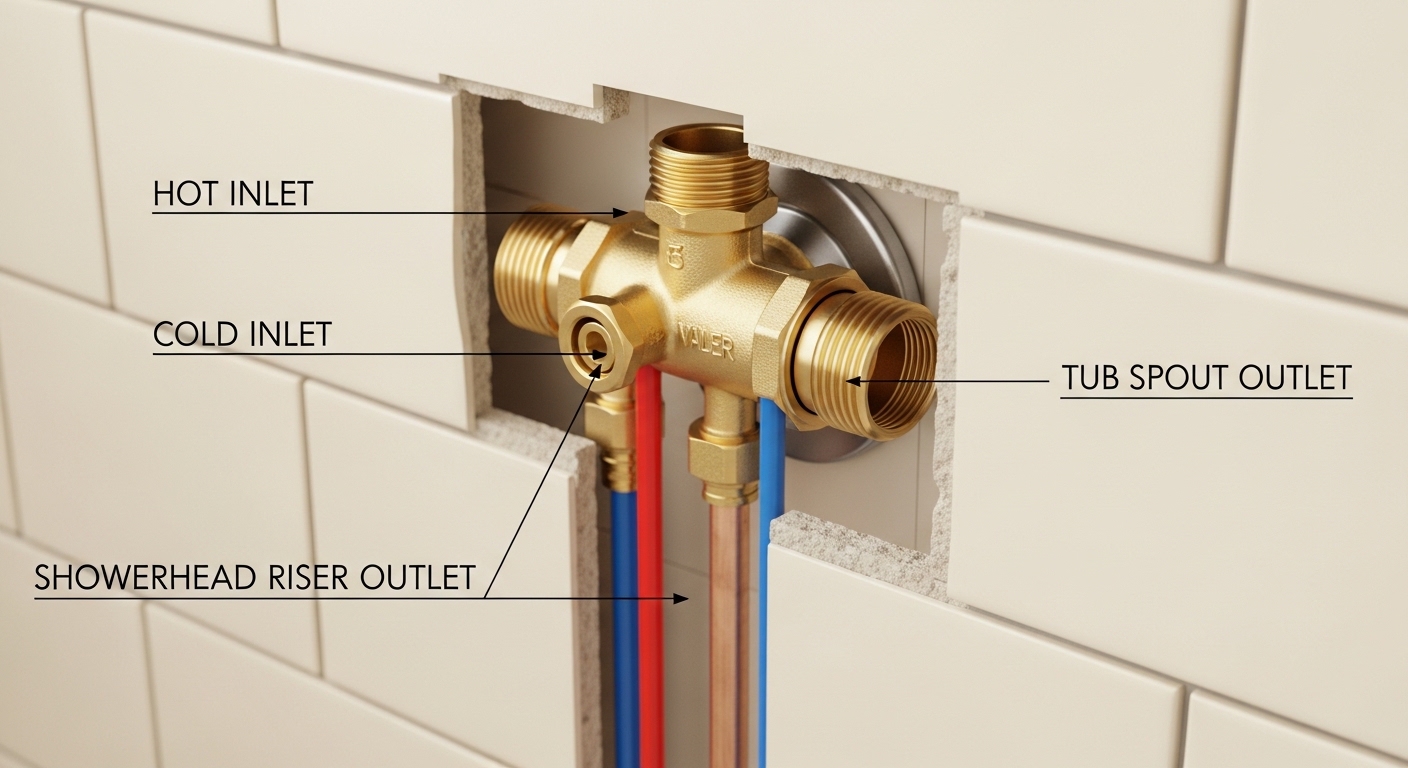
- The rough-in valve body — the brass mixing valve hidden in the wall, with hot and cold inlets and one or two outlets. This is what a “rough in valve replacement” actually means.
Most drips, low pressure, and temperature swings are fixed by replacing the cartridge — the removable internal part — for $15–$60, without opening the wall. You only need a full rough-in replacement when something has gone wrong with the valve body itself. Common triggers:
- A pinhole leak or crack in the brass body (you’ll see water staining the ceiling or wall below).
- Severe mineral corrosion that’s seized the valve — common in hard-water homes.
- An obsolete valve where replacement cartridges are simply no longer made.
- Upgrading from an old non-pressure-balanced valve to a modern anti-scald valve to meet current code.
- You’re renovating and want to switch brands (you generally can’t put Moen trim on a Delta valve).
That last point matters: shower valves are brand-specific systems. If hard water is what killed your valve in the first place, it’s worth understanding which materials and finishes hold up — our breakdown of the best bathroom faucet material for hard water applies directly to shower hardware too.
Do I really need to replace the whole valve, or just the cartridge?
Replace just the cartridge if the valve body is sound and only the internal seals have worn out — that covers about 80% of drips, squealing handles, and temperature problems. Replace the entire rough-in valve only when the brass body is cracked, leaking internally, badly corroded, or no longer compatible with available parts.
Before you cut into a wall, run this quick test. Shut off the water, pull the handle and trim, and remove the cartridge. Then look and feel:
| Symptom | Likely Fix | Open the wall? |
|---|---|---|
| Constant drip from showerhead | New cartridge + seats/springs | No |
| Handle hard to turn / squeals | New cartridge + silicone grease | No |
| Water won’t get hot/cold or scalds | Cartridge or pressure-balance spool | No |
| Water stain on ceiling below shower | Inspect valve body — likely replace | Yes |
| Green corrosion / pinhole on brass body | Full rough-in valve replacement | Yes |
| No cartridge made for your valve anymore | Full rough-in valve replacement | Yes |
If your problem lands in the bottom three rows, you’re looking at a real rough-in replacement. The same “cartridge first, valve body second” logic that fixes a leaky kitchen faucet applies here — our guide on how to fix a leaky kitchen faucet walks through that same diagnostic mindset for sink fixtures.
Can I do a shower rough in valve replacement myself, or should I call a plumber?
You can DIY a shower rough in valve replacement if you’re comfortable shutting off your home’s water, working with copper or PEX, and you have rear access to the valve (an access panel or open studs). Hire a plumber if the valve is soldered into copper behind finished tile, if you smell gas near a water heater, or if you’re not confident sweating a leak-free joint.
Be honest about three things before you commit:
- Access. Is there an access panel behind the shower (often in a closet or adjacent room)? If yes, the job is far easier. If the valve is only reachable by cutting through tile, the difficulty — and risk of an expensive tile repair — jumps sharply.
- Connection type. Copper requires soldering (sweating) or push-to-connect fittings. PEX requires a crimp or expansion tool. CPVC uses solvent cement. Match your skills to what’s in your wall.
- Code. Modern code requires a pressure-balancing or thermostatic anti-scald valve. If you’re replacing an old two-handle valve, you’re also upgrading to meet ASSE 1016 anti-scald standards — a good thing, but it changes the trim too.
A realistic skill check: this job sits a notch above replacing a faucet cartridge and a notch below re-piping a bathroom. If you’ve successfully tightened a loose Delta faucet handle or swapped a cartridge before, you’ve got the mechanical foundation — the new skill to add is making a watertight pipe connection inside a wall.
How do you replace a shower rough in valve step by step?
Replacing a shower rough-in valve comes down to seven steps: shut off water, gain access, disconnect the old valve, dry-fit the new one, connect the pipes, pressure-test, then close up and install trim. Here’s the realistic walkthrough.
- Shut off the water and drain the lines. Use the home’s main shutoff (most showers don’t have local stops). Open the shower and a low faucet to drain residual water — critical if you’re soldering, because heat won’t bond a joint with water in the pipe.
- Open the wall and protect the area. Use the access panel if you have one. If not, cut a clean rectangle in the drywall behind the valve (the back side, if possible). Lay down a towel and a metal heat shield if soldering near studs.
- Disconnect the old valve. For soldered copper, heat the joints and pull the pipes free; for threaded or push-fit, unscrew or release them. Cut the pipes cleanly with a tubing cutter if the joints won’t come apart.
- Dry-fit the new valve. Position it at the correct depth — the printed “plaster guide” on the valve must sit flush with your finished wall surface. Too deep or too proud and your trim won’t seal. Confirm hot is on the left, cold on the right, and the showerhead/tub outlets point the right way.
- Make the connections. Solder copper, crimp PEX, or use push-to-connect fittings for a no-torch option. Keep the cartridge OUT of the valve while soldering — heat destroys the rubber seals. Use thread sealant on any threaded outlets.
- Pressure-test before closing the wall. Reinstall the cartridge, turn the main back on, and run the shower. Watch every joint for 10–15 minutes. This is the single most important step — never close a wall on an untested joint.
- Close up and install the trim. Patch the drywall or reinstall the access panel, then mount the escutcheon, handle, showerhead, and tub spout. Caulk the escutcheon to keep water out of the wall.
Pro tip: take a photo of the old plumbing before you disconnect anything. It’s the cheapest insurance you’ll ever buy when you’re staring at four loose pipes wondering which one fed the tub spout.
What does a shower rough in valve replacement cost in 2026?
Expect to spend $150–$350 in parts for a DIY shower rough in valve replacement, or $400–$900 total if you hire a licensed plumber, with the labor portion typically running $250–$600. Tile or drywall repair afterward can add $100–$400 if there’s no access panel.
| Cost Item | DIY | Plumber |
|---|---|---|
| Rough-in valve body | $60–$180 | $60–$180 |
| Trim kit (handle, escutcheon, head) | $80–$300 | $80–$300 |
| Fittings, solder, tape, caulk | $20–$50 | included |
| Labor | $0 | $250–$600 |
| Wall/tile repair | $0–$150 | $100–$400 |
| Typical total | $150–$400 | $400–$900+ |
The single biggest cost swing is wall access. A home with an access panel can be a $200 DIY afternoon. The same valve behind a custom tile wall can become an $800–$1,200 job once you factor in matching and re-grouting tile. If you’re already renovating, this is the moment to also pick your finish — a coordinated look like a polished nickel faucet and shower set ties the new trim into the rest of the bathroom.
How do I choose the right replacement valve — pressure-balance vs. thermostatic?
For most single-handle showers, choose a pressure-balancing valve; it’s affordable, code-compliant, and prevents scalding when someone flushes a toilet. Choose a thermostatic valve if you want to dial in an exact temperature, run multiple outlets (rain head plus body sprays) at once, or you’re building a higher-end shower system.
| Feature | Pressure-Balancing | Thermostatic |
|---|---|---|
| Anti-scald protection | Yes (balances pressure) | Yes (holds set temperature) |
| Exact temperature control | No | Yes |
| Multiple simultaneous outlets | Limited | Excellent |
| Typical valve cost | $60–$120 | $150–$350 |
| Best for | Standard single-head showers | Spa-style multi-spray systems |
A few buying rules that save headaches:
- Stay in one brand’s ecosystem. Buy the valve and trim from the same manufacturer and series so they’re guaranteed to mate. Mixing brands is the #1 cause of “the trim won’t fit” returns.
- Match your supply lines. Get a valve with inlets that suit your pipe — universal valves with multiple connection options (sweat, IPS, PEX, CPVC) give you the most flexibility.
- Confirm outlet count. A shower-only setup needs one outlet; a tub/shower combo needs two (head and spout). Get this wrong and you’ll be back in the wall.
- Look for a solid warranty and certification. A valve rated to ASSE 1016 / ASME A112.18.1 and backed by a limited lifetime warranty is the baseline you want behind a wall you don’t plan to reopen for 20 years.
FAQ
Can I replace a shower valve without removing the tile?
Sometimes. If there’s an access panel behind the shower (in a closet or adjacent room), you can swap the valve entirely from the back and never touch the tile. Without rear access, you’ll typically need to remove or cut through some tile to reach the valve body — there’s no reliable way around it for a full rough-in replacement.
Do I have to match the valve and trim to the same brand?
Yes, almost always. Shower valves and trim kits are engineered as brand- and series-specific systems. A Moen trim won’t seat correctly on a Delta valve, and vice versa. The safest path is buying the valve and trim from the same manufacturer line, or replacing both together if you’re switching brands.
How long does a shower rough in valve replacement take?
A DIYer with good access usually finishes in 2–4 hours; soldered copper behind finished tile can stretch to a full day once you include cutting, fitting, pressure-testing, and patching. The plumbing itself is quick — it’s the access and wall repair that eat the clock.
Why does my shower drip even after a new cartridge?
If a fresh cartridge doesn’t stop the drip, the valve body’s seats and springs may be worn, or the brass body itself is pitted from hard-water scale, so the cartridge can’t seal. Replace the seats and springs first; if it still drips, the valve body is likely compromised and needs replacing. Persistent mineral scale is a hard-water issue worth addressing at the source.
Is a push-to-connect fitting safe to use inside a wall?
Yes — push-to-connect fittings rated for in-wall use are accepted by most plumbing codes and are a torch-free option for DIYers. That said, many plumbers still prefer soldered or crimped connections for concealed joints because there’s no O-ring to age. If you use push-fit, deburr and mark the pipe to full insertion depth, and always pressure-test before closing the wall.
Do I need a permit to replace a shower valve?
For a like-for-like valve swap, many jurisdictions don’t require a permit, but rules vary widely by city and county. If you’re changing the plumbing layout, upgrading to an anti-scald valve where one didn’t exist, or doing the work in a rental, check with your local building department first — it’s a five-minute phone call that can save a failed inspection later.
The bottom line
A shower rough in valve replacement is one of those jobs that looks scary until you separate it into its real parts: shut off water, get access, make a few clean connections, pressure-test, and close up. The difficulty is driven less by the plumbing and more by your wall — easy with an access panel, genuinely hard behind custom tile. Diagnose first (cartridge before valve body), choose a code-compliant valve and matching trim from one brand, and never close a wall on an untested joint. Do those things and you’ll have a leak-free shower that lasts decades.
Author note: This guide was written by the avitashome fixtures team, who source, test, and write about faucet and shower hardware full-time. We evaluate valves and trim for fit, finish durability, and real-world hard-water performance. avitashome is a dedicated faucet and bathroom-fixtures retailer — we recommend valves rated to ASSE 1016 anti-scald and ASME A112.18.1 standards and backed by a manufacturer limited lifetime warranty, because anything sealed inside a wall should outlast the remodel around it. Always follow your valve manufacturer’s installation instructions and local plumbing code; when in doubt, consult a licensed plumber.