If you just noticed your Delta faucet handle is loose, don’t panic and don’t call a plumber yet. In the vast majority of cases this is a 5-minute, $0 DIY fix using one tiny Allen wrench you probably already own. Below, we walk through exactly why Delta handles loosen, how to identify which handle style you have (single-handle ball, lever cartridge, or two-handle), and the precise step-by-step repair — plus what to do when tightening alone doesn’t solve it.
Why does my Delta faucet handle keep getting loose?
Your Delta handle keeps getting loose because the set screw that clamps the handle onto the stem or ball stem slowly backs out from daily use — every push, pull, and twist creates micro-vibration, and over months that vibration walks the screw counter-clockwise. It’s not a defect; it’s physics. Hard water and mineral buildup around the base accelerate it by adding sideways resistance every time you operate the handle.
There are really only four root causes of a wobbly Delta handle, in order of how common they are:
- Loose set screw (about 85% of cases) — the hex screw under the front or side cap has unscrewed itself.
- Worn handle adapter or “button” — the small plastic insert that couples the handle to the cartridge has cracked or stripped.
- Failing ball/cam assembly (single-handle ball-type faucets) — the cam, cam washer, or rotating ball has worn flats.
- Stripped or rounded stem splines — usually only after years of overtightening or forcing a stuck handle.
If your faucet is less than 10 years old and water still flows correctly, you are almost certainly looking at cause #1. The fix below addresses it directly.
How do I tighten a loose Delta single-handle kitchen or bathroom faucet?
Pop off the small decorative cap on the front or side of the handle, insert a 7/64″ hex (Allen) wrench, and turn clockwise until snug — usually three to six full turns. That’s the whole repair for a single-handle Delta. Here’s the full procedure with the details that matter.
Step 1: Identify your handle type
Delta makes three main handle styles, and the set-screw location differs:
- Lever handle (most kitchen and bath single-handles) — set screw is on the underside or back of the lever, hidden by a round button-cap with the Delta “Δ” logo or a red/blue indicator.
- Cross or knob handle (two-handle widespread/centerset) — set screw is usually under a screw-on top cap that unthreads counter-clockwise by hand.
- Monitor® shower/tub handle — set screw sits at the base of the handle skirt, behind the temperature dial.
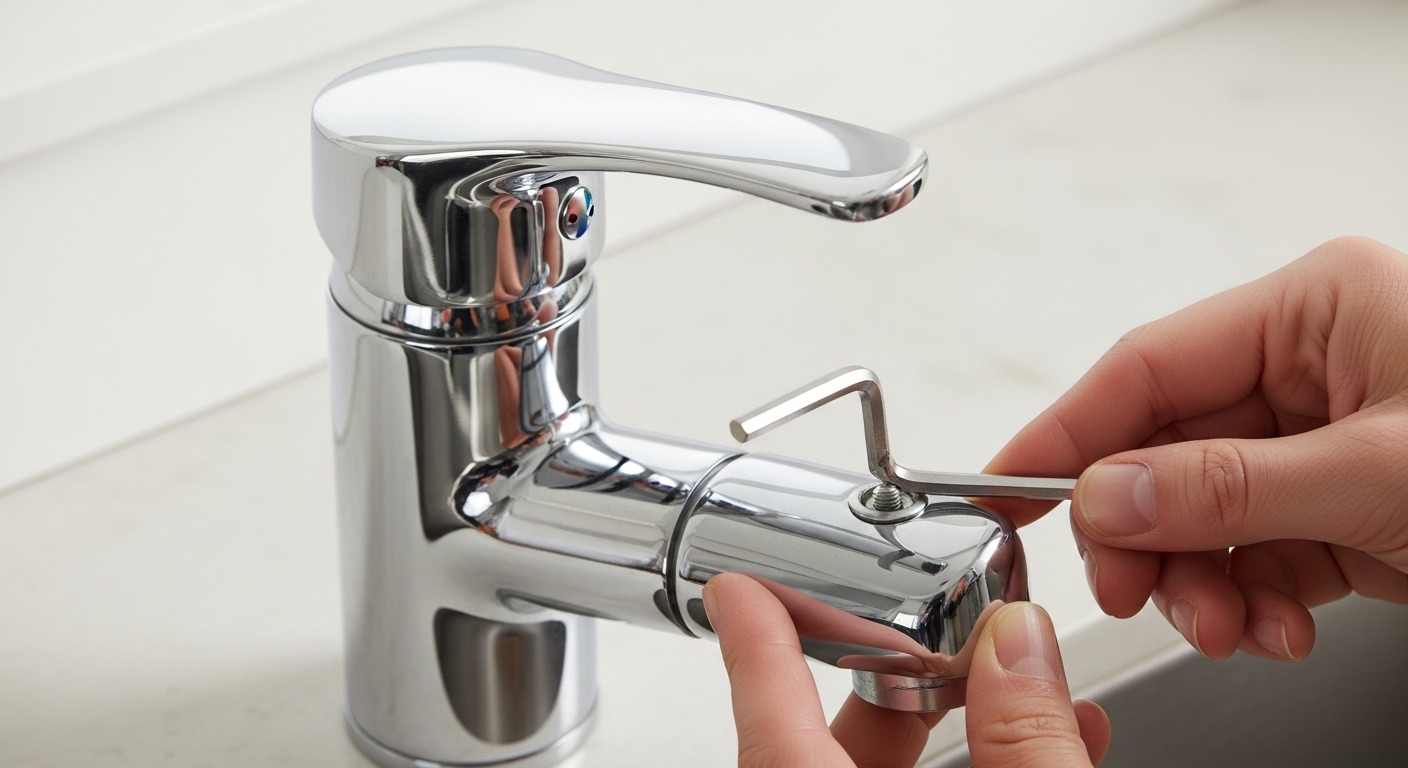
Step 2: Pop the cap (don’t pry the finish)
Slide a thin plastic spudger, a fingernail, or the tip of a flathead screwdriver wrapped in painter’s tape into the seam of the cap. Lift straight up. Never pry against the finished metal — that’s how chrome and champagne bronze finishes get chipped. The cap is held by a small friction o-ring or snap fit; it should release with light pressure.
Step 3: Use the correct hex wrench size
Delta uses a 7/64″ hex wrench for nearly all modern handles (post-2000). Older models from the 1990s sometimes used 3/32″. A 3mm metric wrench will round out the screw — do not substitute. Delta actually includes a 7/64″ wrench in every faucet box; check the original installation bag if you still have it.
Step 4: Tighten clockwise, but don’t overdo it
Turn the set screw clockwise until you feel firm resistance, then add about a quarter-turn more. Stop. Delta’s spec is roughly 25 inch-pounds of torque — about what you’d apply tightening a child’s bicycle seat. Overtightening cracks the brass adapter inside and creates a much bigger repair.
Step 5: Test and re-cap
Operate the handle through its full hot/cold and on/off range. There should be zero wobble, zero lift off the base. Snap the indicator cap back in place. Done.
What if tightening the set screw doesn’t fix the wobble?
If the handle still moves after you’ve tightened the set screw, the screw is clamping on something worn or broken underneath. The fix then depends on what’s underneath, and it’s almost always an inexpensive cartridge-kit replacement — not a new faucet.
| Symptom After Tightening | Likely Cause | Part Needed | Approx. Cost | DIY Difficulty |
|---|---|---|---|---|
| Handle still wobbles side-to-side | Worn handle adapter / button | Delta RP17443 or RP50587 adapter | $8–$15 | Easy (10 min) |
| Handle lifts up off base | Loose cap assembly / ball nut | Adjusting ring + cap wrench | $0 (just retighten) | Easy (5 min) |
| Handle spins freely, no water control | Stripped ball stem or cartridge stem | Delta RP212 ball or RP19804 cartridge | $20–$45 | Moderate (25 min) |
| Handle is loose AND faucet drips | Worn cam, springs & seats | Delta RP4993 repair kit | $10–$18 | Moderate (30 min) |
| Handle loose on a Monitor shower valve | Cracked handle hub | Delta RP46074 handle assembly | $25–$50 | Moderate (20 min) |
One important note: any Delta faucet sold for residential use in North America carries a Lifetime Limited Warranty on the faucet and finish, including free replacement parts for the original owner. If you need an adapter, cartridge, ball, or cam kit, call Delta at 1-800-345-DELTA with your model number (stamped on the underside of the spout or escutcheon) and they will ship the part free. We’ve done this multiple times — it really works.
How do I fix a loose Delta two-handle bathroom faucet?
For a two-handle Delta lavatory faucet, the loose handle is almost always the screw under the top cap, not the set screw on the side. Unscrew the index button on top of the handle counter-clockwise by hand (or with rubber gloves for grip), expose the Phillips or hex screw underneath, and tighten it clockwise. That’s it for 95% of two-handle wobbles.
If the handle continues to spin loosely even with the screw fully tightened, the stem splines underneath are worn. Two-handle Delta faucets use a stem cartridge (commonly RP1740 for older models or H24/H25 stems for newer ones). Replacement is straightforward: shut off the water under the sink, pop the handle off, unscrew the bonnet nut with a 1-1/8″ wrench or basin wrench, and swap the stem. We cover the broader teardown approach in our guide on how to fix a leaky kitchen faucet — the same cartridge logic applies to bathroom two-handles.
Why does my Delta shower handle wobble or pull out?
A loose Delta Monitor shower handle is almost always the small set screw at the base of the handle skirt — it loosens faster than sink handles because shower handles get yanked, pulled, and rotated under more leverage. Locate the screw at the 6 o’clock position on the handle base (you may need to rotate the handle to “off” to see it), insert your 7/64″ hex wrench, and tighten clockwise.
If the handle pulls completely off the wall, you’re looking at a stripped handle hub. Delta’s Monitor 1300/1400 series uses a splined brass stem; when the plastic handle hub strips out, no amount of tightening will hold. The fix is a $25–$50 handle assembly (RP46074 for most modern Monitor valves) — ten minutes of work, no need to open the wall.
Should I shut off the water for a handle repair?
For tightening the set screw alone: no, you don’t need to shut off water. The handle is mechanically separate from the water passage. For any repair that involves removing the handle, cap assembly, ball, or cartridge: yes, always shut off the angle stops under the sink (turn clockwise until stopped) or the shower’s integral stops behind the trim plate. Then open the faucet to relieve line pressure before you take anything apart.
What tools and parts do I need for a Delta handle fix?
You need surprisingly little. For 85% of loose-handle repairs, the entire toolkit is a single hex wrench. For the deeper repairs, add a few basics.
- 7/64″ hex (Allen) wrench — the one tool you absolutely need. Costs $2 or comes free with any Delta faucet.
- Small flathead screwdriver wrapped in painter’s tape — for prying the indicator cap without scratching the finish.
- Adjustable wrench or 1-1/8″ deep socket — for cap and bonnet nut removal if you need to go deeper.
- Plumber’s grease (silicone-based, not petroleum) — for re-greasing o-rings on reassembly.
- Replacement part by model number — only needed if tightening doesn’t solve it; Delta sends free under warranty.
- Old towel — block the drain so dropped screws don’t disappear forever.
You will not need plumber’s putty, Teflon tape, or a torch for a handle repair. Anyone selling you those for this job is overcomplicating it.
How do I prevent the Delta handle from loosening again?
Apply a single drop of blue (medium-strength) threadlocker like Loctite 242 to the set screw before retightening — it cures in 24 hours and holds the screw against vibration but still allows future removal with hand tools. Do not use red (high-strength) threadlocker; you’ll never get the screw out again without heat.
Two other prevention habits actually matter:
- Don’t hang things from the handle. Dish towels, sponges, or a cleaning bucket hooked over the spout transfer sideways force into the handle base.
- Address hard-water buildup at the base. Mineral crust around the handle skirt forces you to push harder, which accelerates loosening. Wipe the base monthly with a 50/50 white vinegar and water solution. For homes on very hard water, choosing the right finish and material matters long-term — our breakdown of the best bathroom faucet material for hard water goes deep on which constructions resist mineral attack best.
When should I just replace the faucet instead?
Replace the whole faucet only if (a) the body is corroded or pitted, (b) the faucet is more than 15–20 years old and you’re already replacing seats/springs every year, or (c) you can see green verdigris on the brass underbody indicating internal corrosion. A loose handle by itself is never a reason to replace a Delta faucet — Delta’s brass bodies and ceramic disc cartridges routinely last 25+ years with cheap cartridge swaps.
That said, if you’re already swimming under the sink and the faucet is dated, it may be the right moment to upgrade — especially if you’re modernizing the kitchen. Touchless and pull-down options have come a long way; if you’re curious, see our guides on widespread touchless faucets and the Moen Doherty kitchen faucet for honest, hands-on comparisons.
How do I find my Delta model number for warranty parts?
Look for a small four-character alphanumeric code (like “9178”, “T17064”, or “B3310LF”) stamped or laser-etched on the underside of the spout where it meets the deck, on the back of the escutcheon plate, or — for shower valves — on the trim sleeve behind the handle. If you can’t find it, take a photo of the faucet and call Delta; their support team can identify nearly any model from a clear photo. The model number determines which adapter, cartridge, or ball assembly is compatible — buying a generic “fits all Delta” part on a marketplace is the #1 reason DIY repairs fail.
FAQ
What size Allen wrench fits a Delta faucet handle?
A 7/64″ hex (Allen) wrench fits virtually all Delta single-handle faucets manufactured after 2000, including Monitor shower valves. Faucets from the 1990s sometimes use 3/32″. Metric wrenches will round out the screw — always use SAE/imperial sizes on Delta hardware.
Why does my Delta faucet handle keep loosening even after I tighten it?
Because the set screw is clamping onto a worn handle adapter or stripped stem, not the original solid splines. Even when the screw is fully tight, the worn coupling underneath still allows handle movement. Replace the adapter (Delta RP17443 for most models) or the ball/cartridge — both are free under Delta’s Lifetime Limited Warranty for the original homeowner.
Can I tighten my Delta handle without turning off the water?
Yes — for tightening the set screw, the water can stay on because the handle is mechanically isolated from the water passage. Only shut off the angle stops under the sink if you plan to remove the handle, cap assembly, or cartridge entirely.
How much does it cost to fix a loose Delta faucet handle?
About $0–$2 for the most common fix (tightening the existing set screw with an Allen wrench you already own). If parts are needed, expect $8–$15 for a handle adapter or $20–$45 for a full ball/cartridge kit — and Delta will ship those free under warranty if you’re the original owner. A plumber service call for the same job typically runs $90–$175 in the U.S.
Is a loose Delta handle covered under warranty?
Yes. Delta’s Lifetime Limited Warranty covers the faucet and finish for as long as the original consumer owns the home, and Delta will send free replacement parts — including adapters, cartridges, balls, and cams — for any defect. Labor isn’t covered, but since this is a 5-minute DIY, that rarely matters. Call 1-800-345-DELTA with your model number to claim parts.
Can a loose handle cause a Delta faucet to leak?
Indirectly, yes. A loose handle puts uneven sideways pressure on the cartridge or ball stem, accelerating wear on the seats, springs, and o-rings underneath. That wear is what eventually produces drips. If you’ve had a wobbly handle for months and now see a slow leak, plan on replacing the seats-and-springs kit (Delta RP4993) at the same time you fix the handle. For a deeper walkthrough on the leak side, see our guide to fixing a faucet that sprays water everywhere, which covers the same internal components.
What’s the difference between a Delta ball-type and cartridge faucet handle?
Ball-type Delta faucets (the classic single-handle kitchen design Delta pioneered in 1954) use a rotating brass or stainless ball with springs and seats — easily identified by the dome-shaped cap under the handle. Cartridge Delta faucets use a sealed ceramic disc cartridge and have a slimmer profile. Both can develop loose handles, but the repair part numbers differ, so identifying which you have before ordering parts saves a trip.
About the author: This guide was written by the AvitasHome fixtures team — plumbers, product engineers, and bathroom designers who have installed, tested, and serviced thousands of Delta, Moen, Kohler, and Pfister faucets in real homes across the U.S. We test every product we recommend on the bench and in working kitchens and baths. AvitasHome is a North American faucet and bathroom-fixtures retailer; all faucets we sell meet NSF/ANSI 61 and 372 lead-free standards and CALGreen / WaterSense flow-rate requirements. For more buying and repair guidance, see our latest bathroom faucets buying guide.
This article is for informational purposes. If you’re uncomfortable with any step, especially shutting off water supplies or working on in-wall shower valves, call a licensed plumber. AvitasHome is not affiliated with Delta Faucet Company; “Delta” and “Monitor” are trademarks of Masco Corporation of Indiana.