 Avitas Home
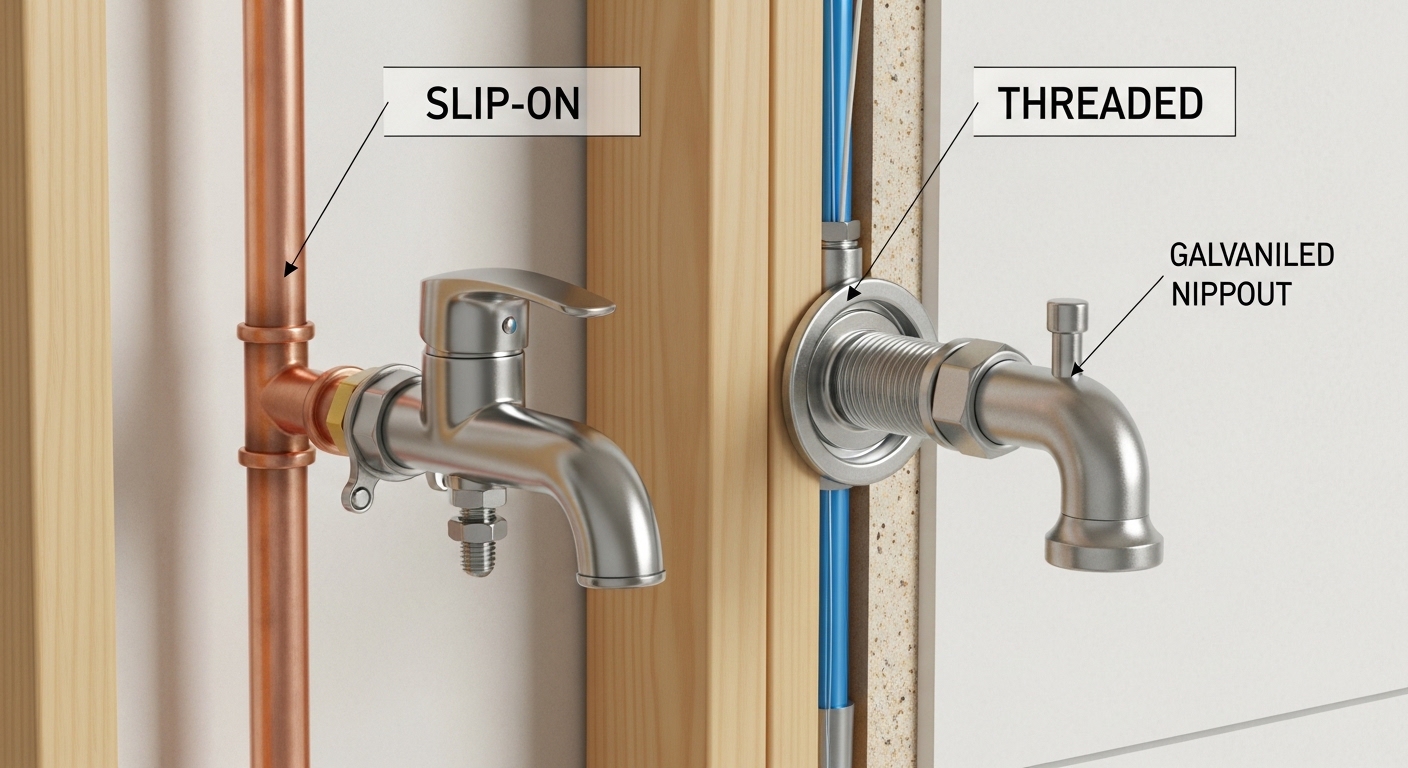
Understanding tub spout connection types is the difference between a five-minute swap and a leaking, wobbling spout you have to redo twice. Most people assume a tub spout is a tub spout — you buy one, twist it on, done. In reality, the little pipe poking out of your shower wall comes in a few standard styles, and if your new spout doesn’t match that style and length, it either won’t seal, won’t tighten, or won’t reach the wall at all. This guide breaks down every common connection type, how to identify what you already have, and how to buy the correct replacement the first time.
At avitashome, we’ve handled thousands of tub spout swaps and warranty questions, and the single most common return reason is a mismatch between the spout’s connection and the home’s plumbing stub-out. So before you add anything to your cart, let’s make sure you know exactly what you’re connecting to.
What are the main tub spout connection types?
There are two dominant tub spout connection types in North American homes: slip-on (also called slip-fit or set-screw) and threaded (screw-on / IPS). A third, less common variant is the rear-threaded (front-mount) telescoping spout, which is really a sub-type of threaded. Everything you’ll find at a hardware store or online falls into one of these categories.
Here’s the quick logic: if your spout has a small hole or slot on the underside near the wall, it’s a slip-on spout secured with an Allen (hex) set screw. If the underside is smooth and solid, and the spout simply spins onto the pipe, it’s a threaded spout. Knowing which family you’re in narrows your buying decision by about 80%.
- Slip-on (set-screw): Slides over a ½-inch nominal copper tube (⅝-inch OD) and clamps down with a hidden hex screw on the bottom.
- Threaded (screw-on / IPS): Threads directly onto a ½-inch IPS pipe or a brass/galvanized nipple; sealed with pipe-thread tape or a rubber gasket.
- Rear-threaded telescoping: A threaded connection housed at the very back of the spout, letting you fine-tune reach — popular in newer builds and remodels.
How do I tell if I have a slip-on or threaded tub spout?
Look at the underside of your current spout, right where it meets the wall. If you see a small round hole or a slot with a set screw inside, you have a slip-on spout. If the bottom is completely smooth with no screw, you have a threaded spout. This 10-second check answers the question for most homeowners.
If the spout is already off, or you’re plumbing new, look at the pipe coming out of the wall instead:
- Smooth copper or CPVC tube sticking out ~4 inches → you need a slip-on spout. The tube is bare with no threads.
- Threaded pipe or a screw-in nipple (you can see the diagonal ridges) → you need a threaded spout.
- A threaded ½-inch drop-ell (elbow) flush inside the wall → you likely need a rear-threaded telescoping spout with the correct nipple length.
One nuance trips people up: many threaded spouts also fit onto an adapter that converts a copper stub-out. So a “universal” spout in the box often includes both a set screw and a threaded brass adapter. That’s fine — just confirm both parts are present before installing.
Which tub spout connection type do I need for my bathtub?
You need the connection type that matches the pipe in your wall — slip-on for a smooth copper stub-out, threaded for an exposed threaded nipple. There’s no “better” type universally; it’s entirely about what your plumber (or builder) roughed in. Trying to force the wrong type is where leaks and stripped threads start.
Here’s how the two compare on the factors that actually matter when you’re choosing:
| Factor | Slip-On (Set-Screw) | Threaded (Screw-On / IPS) |
|---|---|---|
| Connects to | Smooth ½” copper/CPVC stub-out (⅝” OD) | ½” IPS threaded pipe or brass nipple |
| How it seals | O-ring inside spout + set screw clamp | Thread tape (PTFE) or rubber gasket |
| Tools needed | Allen/hex wrench (usually included) | Adjustable wrench or hand-tight + tape |
| Install difficulty | Very easy (5–10 min) | Easy (10–15 min) |
| Length sensitivity | Forgiving — slide to depth, then clamp | Strict — nipple length must be exact |
| Common in | Modern builds (post-2000) | Older homes, galvanized/brass plumbing |
| Leak risk if wrong | Loose clamp = drip behind wall | Cross-thread = stripped, won’t seal |
If you’re replacing a diverter spout (the kind with a pull-up knob that sends water to the shower head), the connection rules are identical — the diverter mechanism is independent of how the spout mounts. If you want a deeper look at diverter-specific durability and finishes, our guide on whether a stainless steel tub spout with diverter is worth it walks through the trade-offs in detail.
How do I measure for the correct tub spout length?
Measure from the finished wall surface to the very end of the pipe stub-out, and also note the pipe’s diameter. For slip-on spouts, you mainly need the stub-out length (typically 4–6 inches). For threaded spouts, the nipple length is critical because the spout must bottom out and sit flush against the wall without a gap.
Here’s the step-by-step measuring process we recommend to every avitashome customer:
- Turn off the water at the shower valve or main, and open the tub faucet to release pressure.
- Remove the old spout. For slip-on, loosen the set screw and pull straight off. For threaded, turn counter-clockwise (use a cloth-wrapped wrench if stuck).
- Measure the exposed pipe: length from wall to pipe end, and outside diameter. A smooth ⅝-inch OD tube = slip-on; a ¾-inch OD threaded pipe = ½-inch IPS threaded.
- Measure the old spout length (back of the wall opening to the tip) so the new one covers the same footprint and hides any escutcheon gap.
- Match or buy a “universal” spout that includes both adapters if you’re unsure.
A common mistake: buying a spout that’s too short for a long stub-out, leaving an ugly gap at the wall, or too long for a threaded nipple so it never tightens fully and spins loosely. When in doubt, a universal telescoping slip-on spout is the most forgiving choice because you can slide it to the exact depth before clamping.
Can I convert from one tub spout connection type to another?
Yes — you can convert between connection types using inexpensive brass adapters, and it’s a common fix when your new spout doesn’t match your existing plumbing. The most frequent conversion is adding a threaded adapter onto a copper stub-out so you can run a threaded spout, or vice versa.
The three realistic conversion paths:
- Copper stub-out → threaded spout: Solder or use a push-fit/compression male-threaded adapter onto the copper, then thread your spout on. Push-fit fittings (like SharkBite-style) make this no-solder.
- Threaded nipple → slip-on spout: Thread a smooth ½-inch copper adapter tube onto the nipple, giving the slip-on spout a tube to grab.
- Deep-set valve → telescoping rear-threaded spout: Use the correct nipple length from the drop-ell to reach the finished wall.
Converting does add a joint, and every extra joint is a potential leak point — so if you can simply buy the matching connection type, do that instead. If you’re already opening the wall or the valve is failing, it may be smarter to address the rough-in at the same time; our walkthrough on shower rough-in valve replacement covers when that’s worth doing yourself.
Why does my new tub spout leak or spin after installing?
A leaking or spinning tub spout almost always means a connection-type or length mismatch, a missing gasket/thread tape, or an under-tightened set screw — not a defective spout. In our experience, over 90% of “faulty spout” complaints trace back to installation, not the hardware.
Diagnose it by connection type:
- Slip-on that spins or drips: The set screw isn’t tight, or the internal O-ring is dry or pinched. Snug the hex screw firmly (don’t strip it) and add a dab of silicone plumber’s grease to the O-ring.
- Threaded that leaks at the wall: You skipped thread tape or the nipple is too long, so the spout never bottoms out. Wrap 3–4 turns of PTFE tape clockwise and re-seat, or cut/swap the nipple to the correct length.
- Water dripping from the tub spout while showering: That’s usually a worn diverter, not the connection — a separate repair.
If your leak is at the handle rather than the spout, that’s a different job entirely. Our step-by-step guide on how to fix a leaking bathtub faucet with a single handle covers cartridge and washer replacement without calling a plumber.
Which finishes and styles come in each connection type?
Both slip-on and threaded tub spouts come in every mainstream finish — chrome, brushed nickel, matte black, polished nickel, brushed gold, and oil-rubbed bronze — so your connection type never limits your look. The connection is internal; the finish is purely aesthetic.
A few style-and-finish notes worth knowing before you buy:
- Chrome and brushed nickel are the most widely stocked in both connection types and the easiest to color-match to existing trim.
- Matte black and brushed gold look premium but show hard-water spotting faster — a real consideration in high-mineral areas.
- Solid brass spouts (regardless of finish) outlast zinc-alloy budget spouts and resist internal corrosion, which matters most on threaded connections where the threads bear the load.
If you’re coordinating a whole bathroom, matching your spout to your shower trim keeps the room cohesive. For finish-specific guidance, our polished nickel faucet and shower guide and our brushed nickel Jacuzzi faucet buying guide both dig into how finishes wear and pair over time.
How the two main tub spout connection types stack up at a glance
To summarize the decision in one line: match the pipe, not the price. Buy the connection type your wall already has, get the length right, and the finish is a free choice. Here’s a final decision cheat-sheet:
| Your Situation | Buy This Connection Type |
|---|---|
| Smooth copper tube out of the wall | Slip-on (set-screw) |
| Threaded pipe/nipple visible | Threaded (screw-on / IPS) |
| Not sure / DIY beginner | Universal telescoping slip-on |
| Older home, galvanized plumbing | Threaded, plus fresh nipple + tape |
| New remodel, deep-set valve | Rear-threaded telescoping |
FAQ
Are tub spout connections universal or standardized?
The pipe sizes are standardized — nearly all use ½-inch nominal plumbing — but the spout connection is not universal. You still have to match slip-on to a copper stub-out and threaded to a threaded nipple. Many spouts sold as “universal” include both a set screw and a threaded adapter so they fit either rough-in.
What size Allen wrench does a slip-on tub spout use?
Most slip-on tub spouts use a 1/8-inch or 7/64-inch (about 3 mm) hex/Allen set screw. The correct wrench is almost always included in the box. Tighten it firmly but stop as soon as it’s snug — over-torquing can strip the soft brass screw.
Do I need plumber’s tape (PTFE) on a threaded tub spout?
Yes, for threaded spouts wrap 3–4 clockwise turns of PTFE thread tape (or use pipe dope) on the nipple before installing to prevent leaks. Slip-on spouts don’t use thread tape — they seal with an internal O-ring and clamp with the set screw instead.
Why is there a gap between my tub spout and the wall?
A gap means the spout is too short for your stub-out, or the nipple is too long on a threaded connection. Fix it with a longer slip-on spout, a shorter nipple, or a matching escutcheon/trim ring. Never leave the gap open, because water and moisture can get behind the wall.
Can I replace just the tub spout without touching the valve?
Yes. In the vast majority of cases you can swap the tub spout on its own — the spout and the shower valve are separate components. Just shut off the water, remove the old spout, match the connection type and length, and install the new one. You only need to touch the valve if it’s the source of a leak or you’re doing a full rough-in.
How long does a good tub spout last?
A quality solid-brass tub spout typically lasts 10–20 years, while budget zinc-alloy spouts may corrode or crack in 3–5 years, especially in hard-water regions. Diverter spouts wear a little faster because the internal diverter is a moving part. Choosing solid brass and a warrantied product is the best longevity insurance.
A note on our testing and expertise
Author note: This guide was written by the avitashome fixtures team, drawing on hands-on installation and replacement of tub spouts across slip-on, threaded, and telescoping connection types in real bathrooms — from 1970s galvanized-plumbing homes to new construction with copper stub-outs. We bench-test spouts for flow, diverter seal integrity, and clamp/thread retention before recommending them.
Brand credibility: avitashome specializes exclusively in faucets and bathroom fixtures, so our recommendations come from a catalog we actually stock, install, and support — not generic affiliate roundups. Every tub spout we carry is checked against standard ½-inch plumbing dimensions and applicable low-lead (NSF/ANSI 372) standards, and our spouts ship with manufacturer warranties covering finish and function. If a connection type doesn’t match your rough-in, our support team will help you identify the correct adapter or replacement before you install — which is exactly why we wrote this guide.