 Avitas Inicio
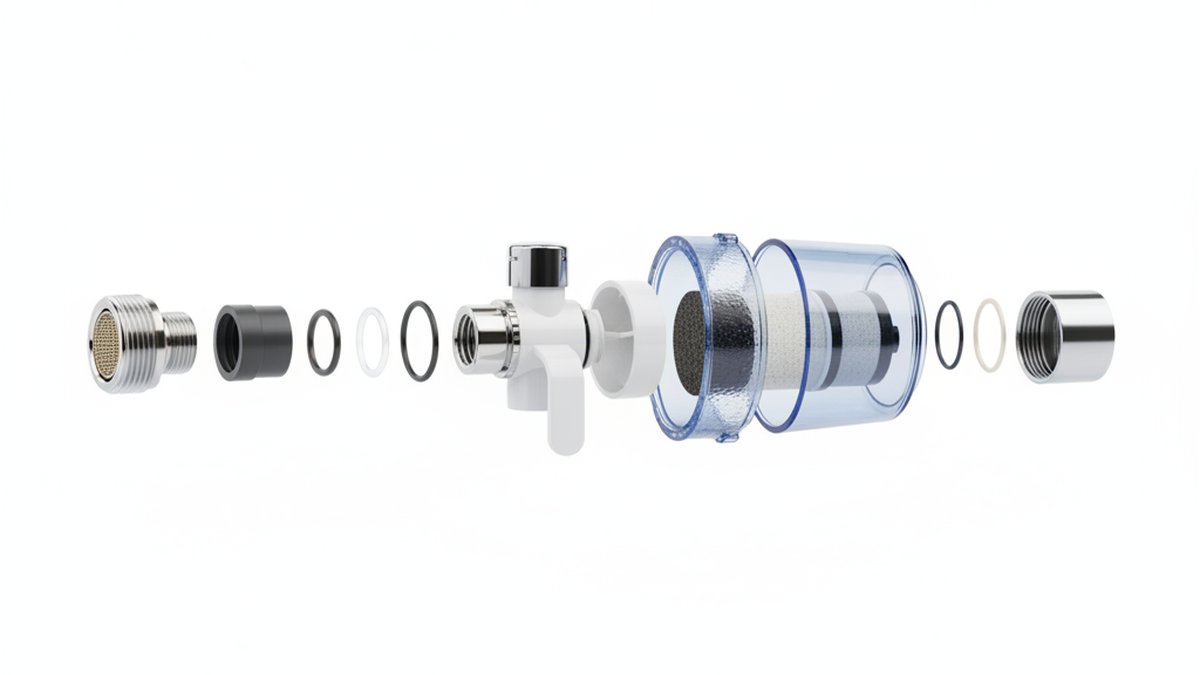
If you’re shopping for faucet water filter parts, you’re usually in one of two situations: your filtered water has slowed to a trickle, or a piece cracked, leaked, or simply wore out and you want the exact replacement without buying a whole new unit. Good news — a faucet-mounted or under-sink filter is a small system with a handful of predictable components, and most of them are cheap, standardized, and swappable in minutes. Below, we’ll walk through every part, how to tell which one is failing, what to check before you buy, and how to avoid the number-one mistake people make (buying a part that doesn’t fit their threads).
What are the main faucet water filter parts, and what does each one do?
A faucet water filter breaks down into six core parts: the cartridge (the actual filter media), the housing that holds it, the diverter valve that switches between filtered and unfiltered water, the O-rings and washers that seal everything, the mounting adapter that threads onto your faucet, and the connectors/tubing if it’s an under-sink model. Everything else is just a variation on these.
Here’s what each does in plain terms:
- Filter cartridge: The heart of the system. Usually activated carbon (often carbon block) that reduces chlorine, taste, odor, sediment, and — in certified models — lead, PFAS, or cysts. This is the part you replace most often.
- Housing / canister: The plastic or stainless shell the cartridge sits inside. On faucet-mounted units it’s the main body; on under-sink units it’s a screw-on canister with a sump wrench.
- Diverter valve: On faucet-mounted filters, the little lever or knob that sends water either through the filter or straight out (so you’re not wasting filter life washing dishes). It’s the most common failure point on tap-mounted units.
- O-rings and rubber washers: Tiny seals that prevent leaks at every joint. When your filter drips where it meets the faucet, it’s almost always a flattened or dried-out O-ring — not a crack.
- Mounting adapter / aerator threads: The threaded collar that connects the filter to your faucet spout. This is where fitment lives or dies (more on that below).
- Connectors, quick-fittings, and tubing: On under-sink and countertop systems, the push-in fittings and 1/4″ or 3/8″ tubing that carry water in and out.
My filtered water slowed to a trickle — which part is clogged?
A sudden drop in filtered flow almost always means a clogged cartridge — replace it first before you touch anything else. Carbon filters load up with sediment and mineral scale over time, and once the media is saturated, flow drops even if the calendar says you have life left. If a fresh cartridge doesn’t fix it, the next suspect is the aerator screen at the very tip of the spout, which catches grit and mineral flakes.
Run this quick diagnostic in order:
- Swap the cartridge. If flow returns, you’re done — the old one was spent or channeled.
- Check the aerator. Unscrew it and look for trapped debris. A clogged aerator mimics a clogged filter exactly. If you’re not sure how, our guide on what to do when your sink aerator is clogged walks through it step by step.
- Soak the mineral scale. Hard-water areas build limescale on threads, screens, and the diverter. A vinegar soak dissolves it — see how to clean a faucet head with white vinegar to get the flow back without buying anything.
- Inspect the diverter. If water leaks backward out of the diverter instead of going through the filter, the internal seal or spring has failed and the diverter needs replacing.
One important note: don’t crank the cartridge in harder to “seat it better.” Over-tightening crushes the O-ring and can actually restrict flow while causing a leak at the same time.
How do I know which faucet water filter parts will actually fit my faucet?
Fitment comes down to three measurements: your aerator thread size, whether those threads are male or female, and your cartridge model number. Get those three right and everything else follows. The single biggest reason returns happen is people buy a cartridge or adapter for a different generation of their own filter.
Standard North American faucet spouts use one of a few aerator thread sizes:
| Thread type | Common size | Where you’ll see it | What it means for parts |
|---|---|---|---|
| Regular male | 15/16″ – 27 | Most standard kitchen/bath faucets | Filter adapter threads onto external spout threads |
| Regular female | 55/64″ – 27 | Faucets with hidden/internal threads | Needs a female-to-male adapter |
| Junior male | 13/16″ – 24 | Smaller bathroom faucets | Often needs a step adapter |
| Cache / hidden aerator | Varies | Modern pull-down kitchen faucets | May not accept a tap-mount filter at all |
For the cartridge itself, ignore thread size and match the manufacturer’s exact model number, printed on the old cartridge or the housing. Filter cartridges are not universal — a same-looking canister from a different brand can have a different bayonet twist, a different height, or a different O-ring groove. If your faucet has a modern pull-down or “cache” aerator, measure carefully; some of these won’t take a clamp-on filter, in which case an under-sink system is the better path. If you’re unsure how aerator threading works in general, our explainer on how to replace a bathroom faucet aerator shows exactly where those threads live and how to read them.
How often should I replace each part, and what does it cost?
Replace the cartridge every 2–3 months (or 100–200 gallons); replace O-rings and the diverter only when they leak, which is usually every 1–3 years. Everything else — the housing, mounting adapter, connectors — typically lasts the life of the system unless physically damaged. That’s what makes these filters cheap to own: you’re mostly buying a small consumable, not the whole unit.
| Part | Typical replacement interval | Rough cost (USD) | DIY difficulty |
|---|---|---|---|
| Filter cartridge | 2–3 months / 100–200 gal | $8–$40 | Very easy |
| O-rings & washers | 1–3 years (or when leaking) | $3–$10 (kit) | Very easy |
| Diverter valve | 1–3 years (tap-mount) | $6–$18 | Easy |
| Mounting adapter | As needed / for a new faucet | $5–$15 | Easy |
| Housing / canister | Rarely (if cracked) | $15–$45 | Moderate |
| Quick-connect fittings & tubing | Rarely (under-sink) | $4–$20 | Moderate |
A quick money-saving tip: buy O-rings as a small assorted kit rather than one at a time. They’re pennies each, they degrade with age even when unused, and having the right size on hand turns a “call a plumber” leak into a two-minute fix. Also track your gallons roughly if your water is hard or sediment-heavy — you’ll hit the low end of the cartridge interval faster than someone on municipal soft water.
Faucet-mounted vs. under-sink filter parts — which is easier to maintain?
Faucet-mounted filters have fewer parts and are easier and cheaper to maintain, but under-sink systems filter more water per cartridge and don’t clutter your spout. If you want the lowest-hassle, lowest-cost path, tap-mount wins; if you want higher capacity and better flow, under-sink wins. Here’s the honest trade-off:
- Faucet-mounted: Cartridge, diverter, adapter, O-rings — that’s basically it. No tools beyond your hands, no plumbing cuts. Downside: smaller cartridges mean more frequent swaps and a bulky attachment on your spout.
- Under-sink: Larger canister, dedicated cartridge, quick-connect fittings, tubing, and sometimes a separate dispenser faucet. More parts, but far longer cartridge life (often 6–12 months) and full flow at the tap. Downside: the initial install involves tapping the cold supply line.
Whichever you have, the maintenance philosophy is identical: the cartridge is the consumable, the seals are the occasional fix, and the body is a buy-once part. If you’re also dealing with an aging tub or bathroom faucet that’s building scale, the same cleaning logic applies — see how to clean a tub faucet aerator when the water barely trickles out, since a filtered line and a scaled aerator produce identical symptoms.
How do I replace a faucet water filter cartridge and O-rings step by step?
You replace a cartridge by shutting off the diverter, twisting off the housing, swapping the cartridge, refreshing the O-ring, and flushing for a few minutes — no tools required on most tap-mount units. Here’s the full sequence that works for the vast majority of faucet-mounted and countertop filters:
- Switch the diverter to unfiltered so no pressure is sitting behind the cartridge.
- Twist off the housing or cartridge cap. Under-sink canisters may need the plastic sump wrench that came with the system.
- Pull the old cartridge straight out. Note the orientation — many cartridges are directional (arrow points in the flow direction).
- Inspect the O-ring. If it’s flattened, cracked, or dried, replace it. Lightly coat the new one with food-grade silicone grease — never petroleum jelly, which degrades rubber.
- Seat the new cartridge until it stops. Hand-tight only. Do not over-torque.
- Flush the filter for 3–5 minutes (or per the manufacturer’s spec) to clear carbon fines before you drink from it.
- Check for drips at every joint. A drip after reassembly is almost always an O-ring that pinched or wasn’t seated — not a defective part.
The whole job takes under ten minutes once you’ve done it once. If your leak turns out to be at the faucet body rather than the filter, that’s a different repair — a worn faucet gasket or stem seal — and our guide on what a single handle faucet gasket is and how to replace it covers that case.
Are cheaper generic filter parts safe, or should I stick with certified ones?
Generic O-rings, adapters, and housings are perfectly fine, but the cartridge itself should be certified — look for NSF/ANSI 42 (taste/odor/chlorine) and NSF/ANSI 53 (lead, cysts, and other health contaminants). The mechanical parts don’t touch contaminant claims, so brand matters less. The media does, so certification matters a lot.
Why the distinction? An O-ring’s only job is to seal, and a correctly sized generic one seals just as well as an OEM one. But a cartridge that claims to reduce lead without third-party certification is just a marketing claim. If lead reduction is your reason for filtering in the first place, pair a certified cartridge with lead-free plumbing upstream — our breakdown of what makes a lead-free bathroom sink faucet explains why the faucet body matters as much as the filter for the water you actually drink.
One more practical point: certification is tied to a specific cartridge model tested at a specific flow and capacity. Swapping in a look-alike “compatible” cartridge from an unknown maker voids that certification even if it physically fits. If health claims are the point, don’t gamble on unbranded media.
A quick word on flow rate and pressure
If your home already has low water pressure, a dense carbon-block cartridge can noticeably reduce flow at the tap. That’s not a defective part — it’s physics. In low-pressure homes, choose a higher-flow cartridge rating and keep the aerator clean so the filter isn’t fighting a second restriction. A clean aerator plus a fresh cartridge is the difference between a satisfying stream and an annoying dribble.
FAQ
Are faucet water filter parts universal across brands?
No. O-rings and generic adapters are often interchangeable by size, but cartridges, housings, and diverters are brand- and model-specific. Always match the cartridge by its printed model number, and match adapters by your faucet’s aerator thread size rather than by brand.
How do I know if it’s the cartridge or the diverter that’s bad?
If flow is weak but water still comes through the filter, it’s a clogged cartridge — replace it. If water leaks backward out of the diverter, sprays from the side, or won’t switch between filtered and unfiltered, the diverter’s internal seal or spring has failed and that part needs replacing.
Can I use a faucet water filter on a pull-down kitchen faucet?
Usually not directly. Pull-down and pull-out sprayers have a hidden “cache” aerator and a spray head that isn’t designed to accept a clamp-on filter. For those faucets, an under-sink or countertop filter with its own dispenser is the right choice — you keep the filter and the faucet’s spray function separate.
How long do the O-rings really last, and can I reuse them?
O-rings typically last 1–3 years but can dry out or flatten sooner in hot or hard-water conditions. You can reuse one if it’s still round, soft, and crack-free, but since a small assorted kit costs only a few dollars, replacing the O-ring every couple of cartridge changes is cheap insurance against leaks.
Why does my new filter still leak after I replaced the cartridge?
Nine times out of ten it’s the O-ring — either pinched during reassembly, missing, or the wrong size. Remove the cartridge, confirm the O-ring is seated flat in its groove, add a thin film of food-grade silicone grease, and hand-tighten only. If it still leaks, check that you didn’t cross-thread the housing.
Do I need to flush a new cartridge before drinking the water?
Yes. New carbon cartridges shed harmless carbon fines that make the first water look gray or cloudy. Run the filter for 3–5 minutes (or the time the manufacturer specifies) until the water runs clear before you drink or cook with it.
Where can I buy the exact replacement part I need?
Start with the model number on your existing cartridge or housing, then match it to the manufacturer’s replacement line or a certified compatible one. For mechanical parts like O-rings, diverters, and adapters, match by measured size. When in doubt, buy the OEM cartridge and a generic seal kit — that combination is both certified and inexpensive.
The bottom line
Faucet water filters are refreshingly simple to keep running: a consumable cartridge, a few seals, a diverter, and the right adapter. Replace the cartridge on schedule, keep a cheap O-ring kit on hand, match your parts by model number and thread size rather than by looks, and insist on NSF-certified media if health claims matter to you. Do that, and you’ll get years of clean, full-flow water without ever replacing the whole system.
About the author: This guide was written by the AvitasHome fixtures team, who spend their days sourcing, installing, and stress-testing faucets, aerators, and filtration components. At AvitasHome (www.avitashome.com) we sell and support bathroom and kitchen fixtures, and we cross-check every recommendation against manufacturer specs, NSF/ANSI standards, and real installation feedback. Filtration cartridge claims referenced here follow NSF/ANSI 42 and 53 testing conventions; always confirm your specific product’s certification and warranty coverage before purchase.