If your wall-mounted faucet is dripping, weeping at the handles, or spitting water from behind the escutcheon, a wall mount faucet repair kit is almost always cheaper and faster than replacing the whole faucet. The catch is that “wall mount faucet repair kit” isn’t one universal product — it’s a category. Wall mount faucets (the ones whose spout and handles come out of the wall instead of the sink deck, common over freestanding tubs, farmhouse and utility sinks, and pot fillers) hide their working parts inside the wall, so the kit you need depends entirely on the valve mechanism behind that finished trim. Get the valve type right and the repair is genuinely easy. Get it wrong and you’ll be standing at the parts counter twice.
This guide walks through how to figure out which kit you need, what’s actually inside these kits, the real-world cost and difficulty, and when a repair kit won’t cut it. I’ll keep it concrete — part names, sizes, and dollar figures — so you can buy once and fix it once.
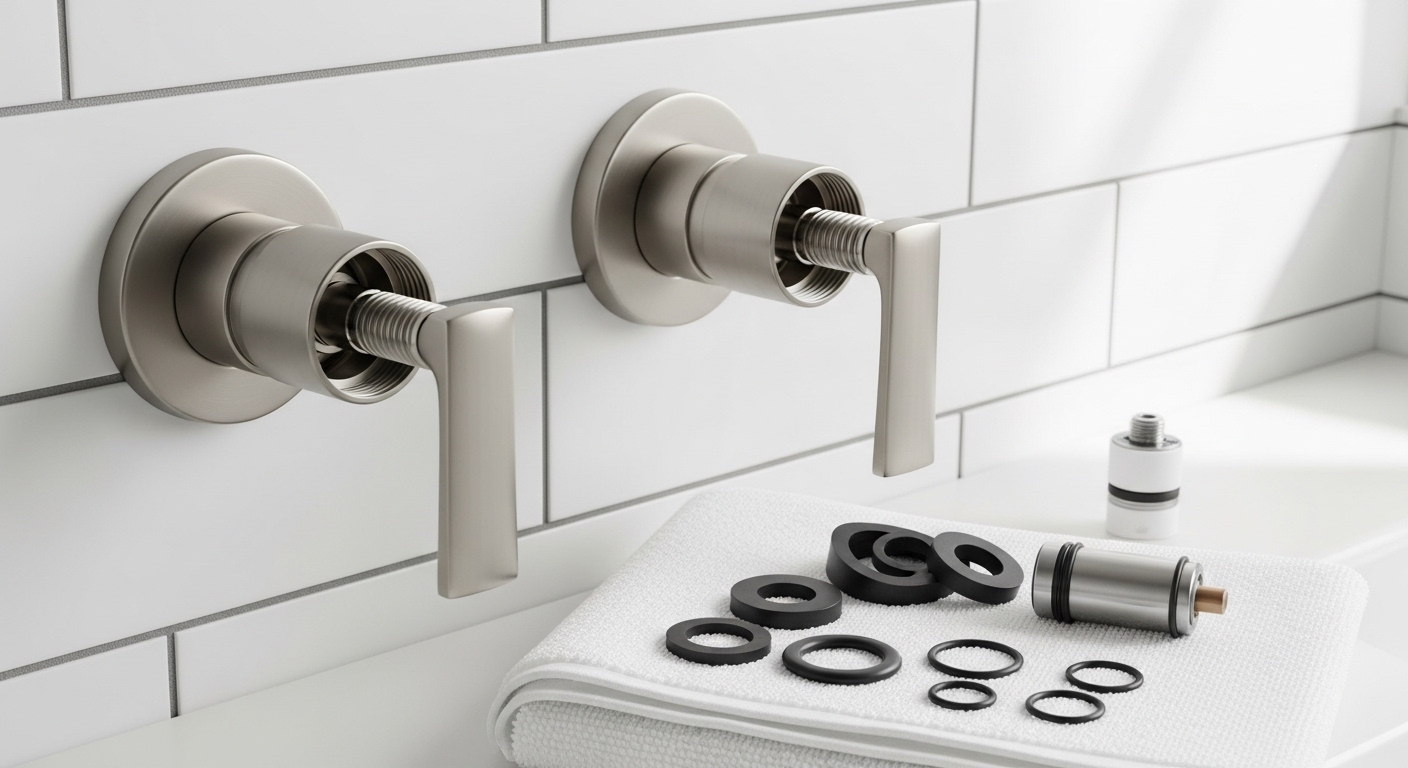
How do I know which wall mount faucet repair kit I need?
Start by identifying the valve type inside, because that — not the finish or the spout shape — decides the kit. Pull a handle off (one screw, usually under a small cap) and look at what’s underneath. There are three common mechanisms in wall mount faucets, and each has its own repair kit.
- Ceramic disc cartridge: A cylindrical cartridge, often with a flat or splined top. These rarely wear out but when they do, you replace the whole cartridge — there are no internal washers to swap. Most modern wall mount and widespread faucets use these.
- Compression stem (washer type): You’ll see a threaded brass stem that screws down. At the bottom is a rubber seat washer held by a brass screw, and the faucet body has a brass seat the washer presses against. This is the classic “drips from the spout” design, and the repair kit is washers, seats, and a seat wrench.
- Ball valve: Less common on wall mounts but found on some single-lever models — a slotted metal or plastic ball over spring-loaded rubber seats. The kit includes springs, seats, cam, and O-rings.
Once you know the mechanism, match the kit to it. If you can read a brand and model off the trim or the original paperwork (Kohler, Moen, Delta, Pfister, Kingston Brass, and many import brands all sell faucet-specific kits), buy the OEM-matched kit — it guarantees fit. If the faucet is unbranded or imported, take the old cartridge or stem to the store and match it by physical dimensions: cartridge length and diameter, number of splines on the stem top, and the broach (the spline pattern the handle grips). For a deeper look at how wall-mounted valve bodies and trim are configured, our complete buyer’s guide for widespread wall mount faucets shows how the rough-in valve and finished trim relate — useful context when you’re staring at unfamiliar parts.
What if I can’t find the brand on my faucet?
No brand is fine — you repair by part geometry, not name. Remove the cartridge or stem entirely and bring it with you (or photograph it next to a tape measure). The three measurements that matter most are overall cartridge length, the outside diameter of the cartridge or stem body, and the spline count on the top where the handle attaches. A universal compression-stem kit covers a surprising number of older and imported wall mount faucets because the rubber seat washers come in standard sizes (00, 0, 1L, etc.). Ceramic cartridges are less universal, so for those, physical matching matters more — but generic replacement cartridges in common diameters (sometimes called 35 mm or 40 mm cartridges) fit a large share of import faucets.
What’s actually inside a wall mount faucet repair kit?
A good repair kit contains the small wear parts that fail first — the rubber and the cartridge — plus a couple of tools. What’s included depends on the valve type, but here’s what you’ll typically find and what each part does.
| Part | What it does | Which valve type needs it |
|---|---|---|
| Ceramic cartridge | The entire on/off and mix mechanism; replaced as a unit | Ceramic disc faucets |
| Seat washers (rubber) | Press against the brass seat to stop flow; wear out first | Compression stem |
| Brass seats | The surface the washer seals against; pits over time | Compression stem |
| O-rings | Seal the stem/cartridge body so water doesn’t leak at the handle | All types |
| Springs & rubber seats | Spring-loaded seals under the ball | Ball valve |
| Bonnet/packing nut washer | Stops weeping around the handle base | Compression & ball |
| Seat wrench / cartridge puller | Removes the brass seat or a stuck cartridge | As needed |
| Plumber’s grease | Lubricates O-rings and cartridge for smooth, leak-free reassembly | All types |
One thing worth knowing: a dripping spout and a leak at the handle base are two different failures. A drip from the spout almost always means the seat washer or cartridge seal is shot. Water seeping out around the handle when it’s on usually means a tired O-ring or bonnet washer. The good news is a complete kit fixes both at once, which is why I always recommend replacing every rubber part you open up rather than just the one that failed — they aged together.
Can I fix a leaking wall mount faucet myself, or do I need a plumber?
For the vast majority of drips and handle leaks, yes — you can absolutely do it yourself with a repair kit and basic hand tools. The repair is mechanically simple; the only real skill is patience and not over-tightening. A plumber becomes worth calling when the leak is inside the wall (you see water damage on the ceiling below or staining on the wall), when the valve body itself is cracked, or when the shutoffs are seized and you’d have to cut into the wall to access the rough-in valve.
Here’s the basic process for a wall mount faucet — it’s broadly the same whether you have a tub filler, a utility sink faucet, or a pot filler:
- Shut off the water. Wall mount faucets often don’t have visible shutoffs at the fixture, so you may need the main supply or the shutoffs in an access panel behind the wall. Open the faucet afterward to confirm the water’s truly off and to relieve pressure.
- Plug the drain so you don’t lose a screw, and lay a towel down.
- Remove the handle. Pop the decorative cap, back out the handle screw, and pull the handle straight off.
- Remove the escutcheon and bonnet nut to expose the cartridge or stem. Use a deep socket or the right wrench so you don’t chew up the brass.
- Pull the cartridge or unscrew the stem. Note its orientation — phone-photo it before it comes out.
- Replace the worn parts from your kit: new cartridge, or new washer + reground/replaced seat + fresh O-rings. Smear plumber’s grease on every rubber part.
- Reassemble in reverse, snug but not gorilla-tight, restore water slowly, and check for drips.
If your faucet is a single-handle tub model and the leak pattern is more about flow control than handle wobble, the troubleshooting overlaps heavily with our walkthrough on fixing a leaking single-handle bathtub faucet without calling a plumber. And if the actual problem is a loose, wobbly handle rather than a water leak, the quick fix in our guide to why a faucet handle gets loose and how to tighten it fast may save you from opening the valve at all.
How long does the repair take and what tools do I need?
Plan on 30–60 minutes for a first-timer, less once you’ve done it. Beyond the repair kit, you need an adjustable wrench or deep sockets, a Phillips and a flat screwdriver, an Allen/hex key set (many handles use a set screw), and possibly a cartridge puller if yours is stuck from mineral buildup. Keep a flashlight handy for looking into the valve body, and have a rag to wipe sealing surfaces clean before reassembly — grit on a sealing surface is the #1 cause of a “repaired” faucet that still drips.
Why does my wall mount faucet keep dripping even after a new washer?
Nine times out of ten, it’s the brass seat — not the washer. The seat is the fixed surface the rubber washer presses against, and over years of use (especially with hard water) it gets pitted or grooved. A brand-new washer pressed against a damaged seat will still leak. That’s why a proper compression repair kit includes replacement seats and a seat wrench: you either grind the old seat smooth with a seat dresser or unscrew and replace it entirely.
Hard water is the other repeat offender. Mineral scale builds up on cartridges and seats, shortens the life of every rubber part, and can lock a cartridge in place so tightly you’ll swear it’s welded. If you’re on hard water, expect to repair faucets more often and consider that when choosing replacement parts and even future fixtures — our breakdown of the best bathroom faucet materials for hard water explains why solid brass valve bodies and ceramic cartridges hold up far better against scale than cheaper zinc-alloy internals.
A few other reasons a “fixed” faucet keeps dripping:
- Wrong washer size. Too small and it won’t seal; too thick and it deforms. Match the original exactly.
- Debris in the valve. When you shut off and restore water, sediment can lodge on the seat. Flush the line before reassembly.
- Over-tightening. Cranking the packing nut crushes the cartridge or warps a washer, causing new leaks. Snug, then a quarter-turn.
- Cracked cartridge. Ceramic discs can crack from a freeze or water hammer — no washer will fix that; replace the cartridge.
Repair kit vs. full faucet replacement: which is the smarter buy?
Repair if the faucet body is sound and only the internals are worn; replace if the body is cracked, the finish is failing, or you can’t source parts. A repair kit runs $8–$45 and an hour of your time; a new wall mount faucet plus install can run $150–$600+. Here’s how the decision usually shakes out.
| Situation | Best move | Rough cost |
|---|---|---|
| Drips from spout, body is solid brass | Repair kit (washer/cartridge) | $8–$45 |
| Leaks at handle base | Repair kit (O-rings/bonnet washer) | $8–$20 |
| Cracked or corroded valve body | Replace faucet | $150–$600+ |
| Finish flaking, parts discontinued | Replace faucet | $150–$600+ |
| Stuck cartridge, body otherwise fine | Repair kit + cartridge puller | $20–$60 |
| Leak originates inside wall | Plumber / rough-in repair | $200–$800 |
If you do conclude the leak is behind the wall in the rough-in valve itself, that’s a bigger job than a trim repair — our guide to how hard a shower rough-in valve replacement really is covers the wall-access version of this problem and will tell you honestly whether it’s still DIY territory.
My rule of thumb: if the faucet is a decent-quality solid-brass fixture and you can get a matching cartridge or stem kit, repair it. These fixtures are built to be rebuilt, and a $20 kit can buy another decade. If it’s a bargain zinc-alloy unit whose finish is already peeling, put the money toward a better faucet instead of repeating repairs.
What should I look for when buying a wall mount faucet repair kit?
Buy for fit first, material quality second, and completeness third. A kit that doesn’t physically match your valve is useless no matter how nice the parts are, so confirm the cartridge dimensions or stem broach before anything else. After fit, prioritize these:
- OEM or known-brand parts. Genuine manufacturer cartridges seal better and last longer than the cheapest generics, especially on ceramic-disc faucets.
- Solid brass and quality rubber. EPDM or silicone seals outlast cheap nitrile in hot water and resist scale.
- Included tools. A seat wrench or cartridge puller in the kit saves a second trip.
- Plumber’s grease included — small thing, but it makes reassembly leak-free and protects the new O-rings.
- A warranty. Reputable cartridge makers back parts against defects; keep the packaging and receipt.
One more practical tip: buy a complete kit even if only one part failed. The marginal cost of the extra washers and O-rings is pennies, and since all the rubber inside your faucet aged at the same rate, replacing it all at once means you won’t be back in there in six months.
FAQ
Are wall mount faucet repair kits universal?
No — there’s no single universal kit. Compression-stem kits come close because rubber seat washers use standard sizes, but ceramic cartridges and ball assemblies vary by brand and model. Always match the kit to your specific valve type and dimensions, ideally by bringing the old part to the store or buying the OEM kit for your faucet’s make and model.
How much does a wall mount faucet repair kit cost?
Most kits run $8 to $45. Simple washer-and-O-ring kits sit at the low end; OEM ceramic cartridge kits and kits that include a seat wrench or cartridge puller land at the higher end. Either way it’s far cheaper than the $150–$600+ of replacing the whole faucet.
Why is my wall mount faucet still dripping after I replaced the cartridge?
Usually because debris got onto the sealing surface during reassembly, the O-rings weren’t greased and seated properly, or the cartridge wasn’t fully seated and clocked to the correct orientation. On compression faucets, a still-dripping spout after a new washer almost always means the brass seat underneath is pitted and needs to be dressed or replaced.
Can hard water damage my faucet’s internal parts?
Yes. Mineral scale builds up on cartridges, seats, and O-rings, shortening their life, and it can cement a cartridge in place so it’s hard to remove. On hard water, expect more frequent repairs and favor solid-brass valve bodies with ceramic cartridges, which resist scale far better than zinc-alloy internals.
Do I need to turn off the main water supply to fix a wall mount faucet?
Often yes. Many wall mount faucets have no fixture shutoffs, so you’ll use the shutoffs in a behind-the-wall access panel if one exists, or the home’s main supply otherwise. After shutting off, open the faucet to confirm the water is fully off and to relieve any trapped pressure before you disassemble anything.
How long should a repaired wall mount faucet last before it leaks again?
With quality parts and proper reassembly, a rebuilt faucet commonly goes 5–10+ years before the rubber wears again — sometimes longer with soft water and a solid-brass body. Using OEM cartridges, replacing all the rubber at once, and not over-tightening are the three biggest factors in how long the repair holds.
A note on expertise and standards
Author note: This guide was written by the avitashome fixtures team, drawing on hands-on rebuilds of wall mount tub fillers, utility, and widespread faucets across compression, ceramic-disc, and ball-valve designs. We’ve matched, installed, and pressure-tested these kits ourselves, which is why the emphasis here is on identifying the valve type rather than chasing brand names.
About avitashome: avitashome (www.avitashome.com) specializes in faucets and bathroom fixtures, and our recommendations favor solid-brass bodies and ceramic-disc cartridges that meet recognized plumbing performance standards. Look for fixtures and replacement cartridges that are tested to NSF/ANSI and cUPC requirements, and keep your repair-kit packaging and receipt — quality cartridge makers back their parts with multi-year warranties, and many faucet manufacturers offer limited lifetime warranties that cover replacement cartridges and seals when you use OEM parts. If you’re unsure whether a repair voids an existing warranty, check your faucet’s documentation before swapping in generic internals.