 Pagina iniziale di Avitas
If you’ve noticed a puddle around the base of your mixer tap or water sneaking into the cabinet below, a worn single handle faucet gasket is one of the most common and cheapest culprits. These little seals do a lot of quiet work — and when they harden, flatten, or crack with age, water finds its way out fast. The good news: identifying the right gasket, buying it, and swapping it is a genuinely beginner-friendly repair. Below we’ll walk through exactly what this part is, how to tell which one you need, how to replace it, and when it’s worth just buying a new faucet instead.
What exactly is a single handle faucet gasket, and where is it located?
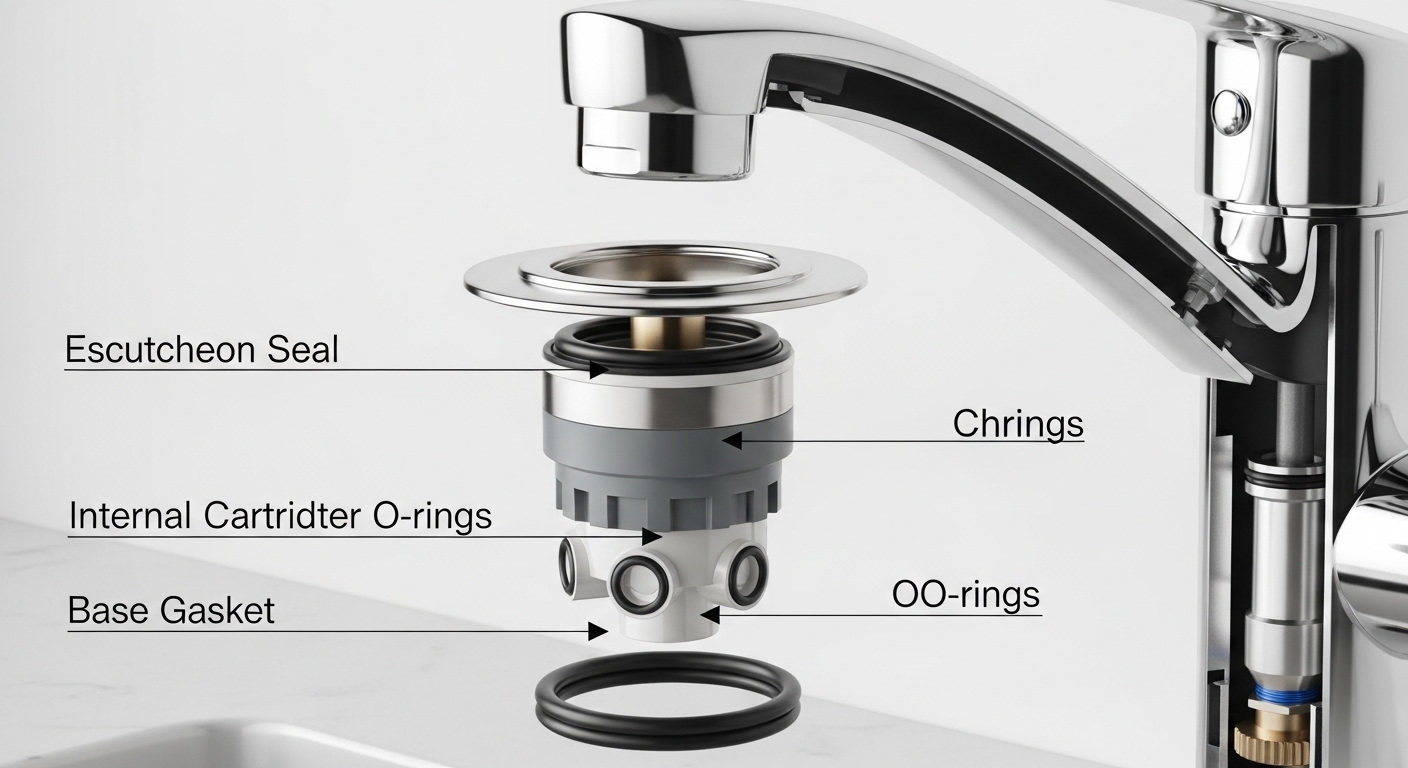
It’s the sealing ring that keeps water from escaping where the faucet meets a surface or where two internal parts join. A single handle faucet actually has more than one gasket, and knowing which is which saves you from ordering the wrong part.
On a typical single-lever kitchen or bathroom faucet you’ll find these sealing points:
- Base gasket (deck gasket / mounting seal): A flat rubber or foam ring under the faucet body where it presses onto the sink or countertop. This stops splash water from creeping under the base and into the cabinet.
- Escutcheon gasket: If your faucet has a wide cover plate spanning three holes, a thin seal sits under that plate too.
- Cartridge O-rings and seals: Inside the valve, small O-rings and a rubber seat seal control the mixed hot/cold water. These are technically gaskets/seals and are the usual cause of a drip from the spout or a leak at the handle.
- Spout O-rings: On pull-down and swivel-spout designs, O-rings seal the rotating spout to the body.
So when someone says their “faucet gasket” is leaking, the first job is figuring out which seal is failing based on where the water shows up. That location tells you everything.
How do I know if it’s the gasket leaking and not the cartridge?
Follow the water. Where the leak appears points directly at the failed seal, and that determines whether you need a cheap gasket or a cartridge.
Here’s the quick diagnostic most homeowners can do in two minutes:
- Water pooling at the base / under the sink, but the spout doesn’t drip: That’s almost always the base or deck gasket (or a loose mounting nut). Cheapest fix of all.
- Water dripping from the spout when the faucet is fully off: That’s an internal seal or cartridge seat — the base gasket is fine.
- Water seeping out around the handle when you turn it on: That’s usually a cartridge O-ring or the handle seal, not the base gasket. We cover that exact scenario in depth in our guide on why a bathroom faucet leaks from the handle.
- Leak from the swiveling spout base: Worn spout O-rings.
If you diagnose an internal issue, the fix often overlaps with a full cartridge job — see our walkthrough on handling a faucet stem valve replacement without calling a plumber, which uses the same tools and teardown steps.
Which single handle faucet gasket material lasts longest?
For most homes, a silicone or high-grade EPDM rubber gasket lasts longest — often 8–15 years — while cheap standard rubber can harden in 3–5 years, especially with hot water and hard-water minerals. Foam gaskets seal well initially but compress and fail fastest.
Here’s how the common gasket materials stack up so you can buy once and forget it:
| Gasket Material | Typical Lifespan | Best For | Weakness |
|---|---|---|---|
| Silicone | 10–15 years | Hot water lines, hard water, high-use kitchens | Costs a little more |
| EPDM rubber | 8–12 years | General-purpose base and cartridge seals | Degrades with some oils/solvents |
| Standard nitrile/rubber | 3–6 years | Budget replacements, low-use bathrooms | Hardens and cracks with heat over time |
| Foam / sponge | 2–5 years | Base cushioning only (not pressure sealing) | Compresses flat, absorbs water |
If you live somewhere with hard water, the minerals accelerate wear on every seal in the faucet — not just the gasket. It’s worth periodically descaling the whole fixture; our guide on cleaning a faucet head with white vinegar shows the same vinegar-soak trick that helps keep O-rings and gaskets from getting crusted and torn.
How do you replace a single handle faucet gasket step by step?
You replace it by shutting off the water, lifting or unscrewing the faucet enough to reach the seal, swapping the old gasket for a matching new one, and reassembling. A base gasket takes 20–40 minutes; an internal cartridge seal is similar. Here’s the full sequence for the base/deck gasket, which is the most common DIY case.
- Shut off the water. Turn the two shutoff valves under the sink clockwise until they stop, then open the faucet to release pressure and confirm the water is off.
- Disconnect the supply lines. Use an adjustable wrench to loosen the supply-line nuts at the faucet shanks. Keep a towel and small bucket handy — a little water always drains out. (If you’re also upgrading lines, check our note on the most common faucet supply line size so the new ones actually fit.)
- Remove the mounting nut(s). Under the sink, unthread the plastic or brass mounting nut that clamps the faucet to the deck. A basin wrench makes this far easier in tight cabinets.
- Lift the faucet out. Gently pull the faucet up from above. The old base gasket will be stuck to the underside of the body or to the sink deck.
- Clean and inspect. Peel off the old gasket, scrape away any hardened residue or mineral scale, and wipe the deck clean and dry. A clean surface is half of a good seal.
- Fit the new gasket. Seat the replacement gasket onto the faucet base, matching the hole pattern exactly. Do not stretch or force it.
- Reinstall and tighten. Set the faucet back in place, hand-tighten the mounting nut, then snug it with the wrench — firm, not gorilla-tight (over-torquing cracks plastic nuts and distorts the gasket).
- Reconnect and test. Reattach the supply lines, turn the water back on slowly, and watch the base and the connections for 60 seconds. Then check again under the sink after an hour of normal use.
If your leak turned out to be internal, the teardown is nearly identical to a cartridge job — our step-by-step on faucet cartridge replacement in a bathtub covers pulling the cartridge, replacing its seals, and reseating it without cross-threading anything.
Where do I find the right replacement gasket for my faucet?
Start with your faucet’s brand and model number — most manufacturers sell an exact-fit repair kit, and using the OEM gasket guarantees the size and hole pattern match. If you can’t find a model number, measure the old gasket’s outer diameter, inner diameter, and hole spacing, then match a universal kit.
A few practical tips that save a second trip:
- Buy the kit, not just the ring. Most repair kits include the base gasket, cartridge O-rings, and a seat seal for a few dollars more — cheap insurance while you already have the faucet apart.
- Match the material to your water. If you had premature failure, upgrade to silicone or EPDM rather than the standard rubber that came with a budget faucet.
- Grab a small tube of plumber’s silicone grease. A thin smear on O-rings makes assembly smoother and extends seal life.
- Confirm compatibility with related parts. If you’re touching the aerator or spout while you’re in there, our guide on how to measure faucet aerator thread size helps you order matching parts.
Buying a quality single handle faucet gasket or full repair kit up front — rather than the cheapest generic ring on the shelf — is the single biggest factor in whether you’re doing this repair again in three years or in twelve.
Is it worth replacing the gasket, or should I just buy a new faucet?
Replace the gasket if the faucet finish, handle, and body are still in good shape — a $10 seal on a $250 faucet is a no-brainer. Buy a new faucet if the body is corroded, the finish is peeling, the cartridge is also worn, or the faucet is 12+ years old and out of warranty. At that point you’re throwing good parts after bad.
A simple way to decide:
| Situation | Best Move |
|---|---|
| Leak only at base, faucet looks and works great | Replace the gasket |
| Base gasket + minor spout drip | Replace the full seal/O-ring kit |
| Corroded body, flaking finish, stiff handle | Replace the faucet |
| Faucet under manufacturer warranty | Claim free parts from the maker first |
| You want an upgraded look/features anyway | Replace the faucet |
One thing people forget: many quality faucets carry lifetime limited warranties that cover seals and cartridges. Before you buy anything, check whether your faucet qualifies — the manufacturer will often ship the exact gasket kit for free. If you do decide to replace the whole fixture, it’s worth choosing one built to reduce future seal failures; browsing by manufacturer reputation, like in our roundup of the best kitchen faucets by brand, helps you pick a body and valve that won’t leak again in a few seasons.
How do I make a new gasket last (and avoid doing this again)?
Don’t over-tighten, keep the seals clean of mineral scale, and use silicone-based grease on O-rings — those three habits alone can double the life of any faucet gasket. Water pressure and heat do the aging; you can’t stop that, but you can slow it.
A few maintenance moves that genuinely matter:
- Wipe the base dry after big splashes in high-use kitchens so standing water doesn’t sit against the seal all day.
- Descale periodically if you have hard water — mineral grit is abrasive and tears rubber over time.
- Re-snug the mounting nut once a year. Normal use and vibration slowly loosen it, and a slightly loose faucet lets the base gasket weep.
- Use plumber’s grease, never petroleum jelly. Petroleum products can swell and degrade rubber O-rings.
FAQ
Can I use plumber’s putty or silicone caulk instead of a gasket?
Sometimes, but not as a straight substitute. Many faucets are designed to seal with either a gasket o a bead of plumber’s putty/silicone under the base — check your installation instructions. If your faucet came with a gasket, use a gasket; putty on a gasket-designed base can prevent a proper seal. Never use plumber’s putty on plastic or certain stone counters where it can stain.
How much does a single handle faucet gasket cost?
A single base gasket runs about $3–$8, and a complete repair kit with the base gasket, cartridge O-rings, and seat seals typically costs $8–$20. Compared to a plumber’s minimum service call of $100–$200, doing it yourself is a huge saving for a 30-minute job.
Why does my faucet gasket keep leaking after I replaced it?
The three usual reasons are: the gasket doesn’t match the hole pattern or size, the sealing surface wasn’t cleaned of old residue and scale, or the mounting nut is too loose (or the plastic nut cracked from over-tightening). Pull it apart, verify the fit, clean the deck completely, and tighten to firm — not maximum — torque.
Do single handle and double handle faucets use the same gaskets?
The base/deck gaskets are often similar, but the internal seals differ. A single handle faucet mixes hot and cold through one cartridge with its own O-ring set, while a two-handle faucet has separate valve stems and seals per side. Always match parts to your specific faucet type and model rather than assuming they interchange.
How long does it take to replace a faucet gasket?
For a base gasket, plan on 20–40 minutes including shutting off water and testing. An internal cartridge or O-ring swap is similar, maybe 30–50 minutes if you’re removing a stubborn cartridge. First-timers should budget an extra 15 minutes and keep the faucet’s parts diagram handy.
Is a leaking faucet gasket an emergency?
Usually not, but don’t ignore it. A slow base leak into the cabinet can rot the sink base, warp the countertop substrate, and grow mold over weeks. It’s a low-cost, low-skill fix, so it’s worth handling within a week or two rather than letting water sit under the sink.
Author note: This guide was written by the Avitas Home fixtures team, drawing on hands-on faucet installation and repair experience across thousands of kitchen and bathroom builds. We physically test the seals and cartridges in the faucets we stock rather than relying on spec sheets alone.
About Avitas Home: Pagina iniziale di Avitas (www.avitashome.com) specializes in faucets, shower fixtures, and bathroom hardware for homeowners across the USA. Every faucet we sell meets U.S. lead-free plumbing standards (NSF/ANSI 61 and 372), and we back qualifying fixtures with manufacturer warranties that cover seals and cartridges — so if a gasket fails prematurely, you’re covered. As always, when a repair is beyond your comfort level or your faucet is still under warranty, contact the manufacturer or a licensed plumber before proceeding.